

RecyclerView in Android: Animal app
When it comes to displaying lists or grids of data in Android, one of the most essential and versatile components is RecyclerView. Introduced in Android 5.0 (Lollipop), It replaces the now-deprecated ListView and GridView and offers a more flexible and customizable way to handle lists of data. Its ability to recycle views and optimize memory usage has made it a go-to choice for developers when dealing with dynamic content. In this blog, we’ll dive into RecyclerView and explore its functionalities, along with some best practices for using it effectively in your Android app
Table of Contents
What is RecyclerView?
RecyclerView is a ViewGroup that allows you to display a large dataset of items in a list or grid format. It is responsible for recycling views that are no longer visible on the screen and reusing them for new data, reducing memory usage and enhancing performance. This mechanism, combined with its customizability, makes RecyclerView the preferred choice over its predecessors.
It is a part of the Android Support Library and later incorporated into AndroidX.
Implementing RecyclerView
Step 1: Add the RecyclerView dependency
implementation ‘androidx.recyclerview:recyclerview:{latest_version}’
Step 2:In your XML layout file, add the RecyclerView element to define its position and size.
Step 3: Create the Layout for Your List Item Create a layout file that represents the individual item in the list.
Step 4: Create the RecyclerView Adapter
To populate data into the RecyclerView, you need to create a custom RecyclerView Adapter. The adapter is responsible for creating views and binding data to them. It extends RecyclerView.Adapter and requires you to override three primary methods:
- onCreateViewHolder: This method is called when RecyclerView needs a new ViewHolder to represent an item.
- onBindViewHolder: This method binds the data to a ViewHolder at the specified position.
- getItemCount: This method returns the number of items in your dataset.
Step 5: Create the ViewHolder
Create a ViewHolder class that extends RecyclerView.ViewHolder.The ViewHolder will hold references to the views within each item layout.
Step 6: Set the LayoutManager and Adapter
In your Activity or Fragment, set the LayoutManager and Adapter to the RecyclerView.
Kotlin:
 val recyclerView = findViewById<RecyclerView>(R.id.recyclerView)
        recyclerView.layoutManager =
            LinearLayoutManager(this) // Use LinearLayoutManager for a vertical list
        recyclerView.adapter=adapter
Java:
RecyclerView recyclerView = findViewById(R.id.recyclerView);
recyclerView.setLayoutManager(new LinearLayoutManager(this)); // Use LinearLayoutManager for a vertical list
recyclerView.setAdapter(adapter);
Choose a layout manager based on how you want to display the items: LinearLayoutManager for a vertical or horizontal list, GridLayoutManager for a grid, or StaggeredGridLayoutManager for a staggered grid layout.
Example
Let’s take a look at an example for RecyclerViewthrough making small animal app.
Animal App

Create new project select empty activity and give name Animal App.
Creating row for the Image and Text
First create style file that contains color of the app.
Goto res->values and create new values Resource File
Styles.xml
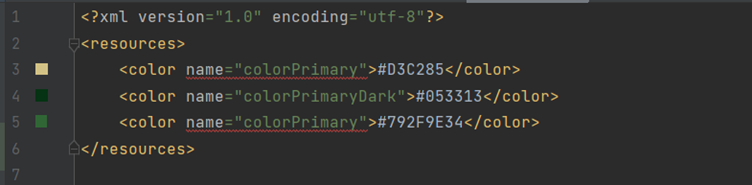
792F9E34 only 6 numbers gives the color extra 2 number is added for transparency of the color.
Create template for row
Goto res->Layout->new->Layout Resource File to create Layout(template)
Change <android.constraintlayout.widget.Constraintlayout> to <android.cardview.widget.CardView>
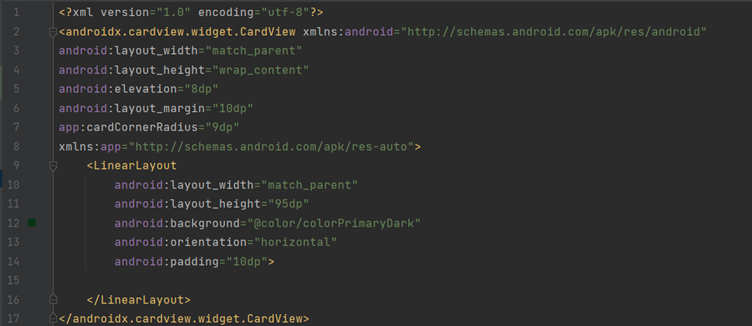
Linear Layout it is the layout where we stored child or other layout linearly.So they can put next to each other horizontally or Vertically that is attribute or orientation.
android:orientation=”horizonatal”
Inside linear layout put cardview and TextView and inside cardview put imageView.

android:elevation=”5dp” attribute is used for shadow effect on image.app:cardCornerRadius=”9dp” is used for rounded corner .
Design is as below:

RecyclerView and RecyclerAdapter
Goto activity_main.xml add attribute according to requirement and add RecyclerView.
<?xml version="1.0" encoding="utf-8"?>
<androidx.constraintlayout.widget.ConstraintLayout xmlns:android="http://schemas.android.com/apk/res/android"
    xmlns:app="http://schemas.android.com/apk/res-auto"
    xmlns:tools="http://schemas.android.com/tools"
    android:layout_width="match_parent"
    android:layout_height="match_parent"
    android:background="@color/colorPrimary"
    tools:context=".MainActivity">

    <TextView
        android:id="@+id/textView2"
        android:layout_width="wrap_content"
        android:layout_height="wrap_content"
        android:text="Animal"
        android:textColor="@color/black"
        android:textSize="25dp"
        app:layout_constraintBottom_toBottomOf="parent"
        app:layout_constraintEnd_toEndOf="parent"
        app:layout_constraintHorizontal_bias="0.498"
        app:layout_constraintStart_toStartOf="parent"
        app:layout_constraintTop_toTopOf="parent"
        app:layout_constraintVertical_bias="0.022" />

    <androidx.recyclerview.widget.RecyclerView
        android:id="@+id/recycler_view"
        android:layout_width="match_parent"
        android:layout_height="0dp"
        app:layout_constraintBottom_toBottomOf="parent"
        app:layout_constraintEnd_toEndOf="parent"
        app:layout_constraintStart_toStartOf="parent"
        app:layout_constraintTop_toBottomOf="@+id/textView2" />

</androidx.constraintlayout.widget.ConstraintLayout>
To inflate row inside recycleview we need adapter.
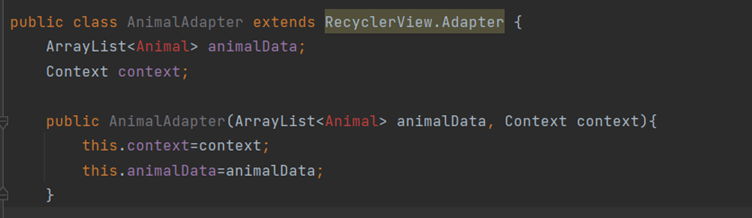
Creat new class with name AnimalAdapter this class must extends RecyclerView.Adapter.
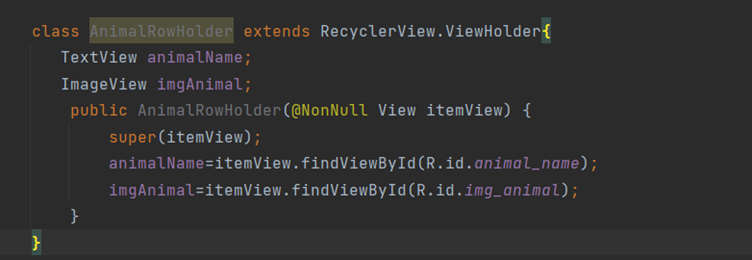
Inner classs AnimalRowHolder
We need class which will be the holder for row, that means we create object for each row is an object.
Create this class inside AnimalAdapter class that is called inner calss.
It must extend RecyclerView.ViewHolder.
Create constructor by autocompletion.
Declare and initialize TextView and ImageView variables.
Here used itemView.findViewById bcoz findviewById is on views in mainActivity.java it knows that we are working on view but not in this case.
Kotlin:
 inner class AnimalRowHolder(itemView: View) : RecyclerView.ViewHolder(itemView) {
        var animalName: TextView
        var imgAnimal: ImageView

        init {
            animalName = itemView.findViewById<TextView>(R.id.animal_name)
            imgAnimal = itemView.findViewById<ImageView>(R.id.img_animal)

        }
    }
Java:
Now In AnimalAdapter implement the method by autocompletion those are onCreateViewHolder,onBindViewHolder,getItemCount.
Create constructor for AnimalAdapter & pass ArrayList object & Context.
Kotlin:
class AnimalAdapter(
    animalData: ArrayList<Animal>,
    private var context: Context,

) :
    RecyclerView.Adapter<AnimalAdapter.AnimalRowHolder>() {
    var animalData: ArrayList<Animal>


    init {
        this.animalData = animalData

    }
Java:
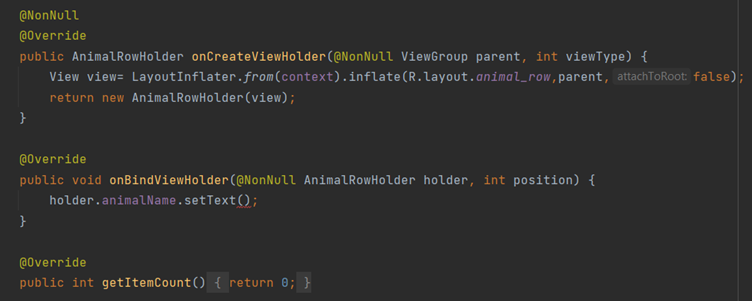
OnCreateViewHolder
The invocation of this method is depend on the memory of device & how many items the screen represents.
Inflate Animal row by the comman
View view=LayoutInflater.from(context).inflate( )// This is to know our app in which context is created
Kotlin:
override fun onCreateViewHolder(parent: ViewGroup, viewType: Int): AnimalRowHolder {
        val view=LayoutInflater.from(parent.context)
            .inflate(R.layout.animal_row,parent,false)
        return AnimalRowHolder(view)
    }
Java:

attachToRoot most time is false so don’t worry much .
return AnimalRowHolder(view) this view is assigned to itemView.
onBindViewHolder
This is call Whenever Scrolling.
animalName gives error bcoz this Holder does not have textview that is bcoz we have used RecyclerView.ViewHolder we need to used AnimalRowHolder.
Error:method does override appropriate method
To fix this AnimalAdapter need to extends RecyclerView.Adapter of type AnimalRowAdapter.it is done by command
RecyclerView.Adapter<AnimalAdapter.AnimalRowHolder>
Replace return type RecyclerView.ViewHolder to AnimalRowHolder.
Now used holder txtAnimalName.setText();
Create Animal java Class
Type of mage is integer.
Create Constructor
To create getter and setter right click & goto generator.
After that goto AnimalAdapter importing Animal some Animal class related isuue is resolved.
onBindViewHolder
set animalData.get(Position).getName() in setText().
Add holder.imgAnimal.setImageResource(animalData.get(Position).getimg())
Kotlin:
public void onBindViewHolder(@NonNull AnimalRowHolder holder, int position) {
        holder.animalName.setText(animalData.get(position).getName());
        holder.imgAnimal.setImageResource(animalData.get(position).getImg()).
    }
Java:

getCount
It is basically size of ArrayList.
Kotlin:
public int getItemCount() { return animalData.size(); }Java:

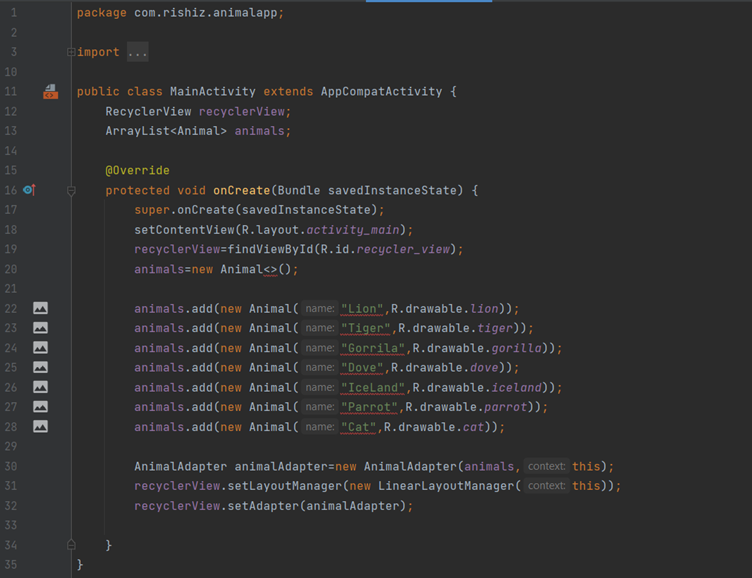
Create ArrayList and Initializing RecylerView MainActivity
Kotlin:
package com.rishiz.animalapp

import android.content.Intent
import android.os.Bundle
import androidx.appcompat.app.AppCompatActivity
import androidx.recyclerview.widget.LinearLayoutManager
import androidx.recyclerview.widget.RecyclerView


class MainActivity : AppCompatActivity(){
    var recyclerView: RecyclerView? = null
    var animals: ArrayList<Animal>? = null
    override fun onCreate(savedInstanceState: Bundle?) {
        super.onCreate(savedInstanceState)
        setContentView(R.layout.activity_main)
        recyclerView = findViewById<RecyclerView>(R.id.recycler_view)
        animals = ArrayList<Animal>()
        animals!!.add(Animal("Lion", R.drawable.lion))
        animals!!.add(Animal("Tiger", R.drawable.tiger))
        animals!!.add(Animal("Gorrila", R.drawable.gorilla))
        animals!!.add(Animal("Dove", R.drawable.dove))
        animals!!.add(Animal("IceLand", R.drawable.iceland))
        animals!!.add(Animal("Parrot", R.drawable.parrot))
        animals!!.add(Animal("Cat", R.drawable.cat))
        val animalAdapter = AnimalAdapter(animals!!, this, this)
        recyclerView.setLayoutManager(LinearLayoutManager(this))
        recyclerView.setAdapter(animalAdapter)
    }


    }
}
Java:
Handling Clicks on RecyclerView items
Create interface MyClickInterface inside Animal Adapter.
Kotlin:
interface MyClickInterface {
        fun onItemClick(positionOfTheAnimal: Int)
    }
Java:

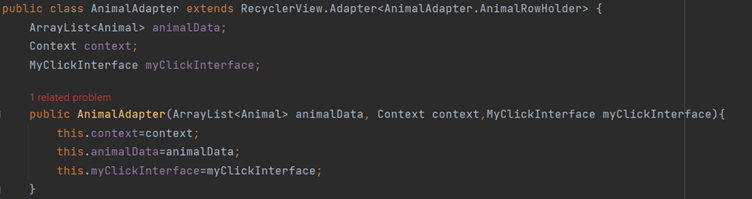
Declares it has field in Animal Adapter class.Pass interface as a parameter inside adapter Constructor.
Kotlin:
public class AnimalAdapter extends RecyclerView.Adapter<AnimalAdapter.AnimalRowHolder> {
    ArrayList<Animal> animalData;
    Context context;
    MyClickInterface myClickInterface;

    public AnimalAdapter(ArrayList<Animal> animalData, Context context,MyClickInterface myClickInterface){
        this.context=context;
        this.animalData=animalData;
        this.myClickInterface=myClickInterface;
    }
Java:
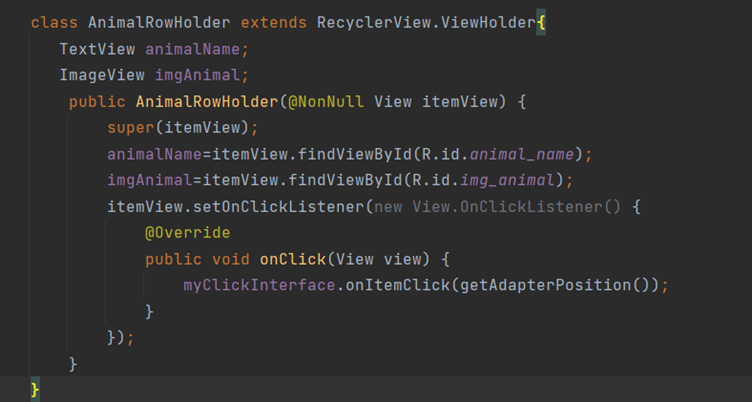
Set listener inside AnimalRowHolder Constructor.
Kotlin:
 inner class AnimalRowHolder(itemView: View) : RecyclerView.ViewHolder(itemView) {
        var animalName: TextView
        var imgAnimal: ImageView

        init {
            animalName = itemView.findViewById<TextView>(R.id.animal_name)
            imgAnimal = itemView.findViewById<ImageView>(R.id.img_animal)
            itemView.setOnClickListener {
                myClickInterface.onItemClick(
                    adapterPosition
                )
            }
        }
    }
Java:
Implement this interface by MainActivity and override the methods.
Creating AnimalInfo activity
Create new empty Activity with name AnimalInfo.
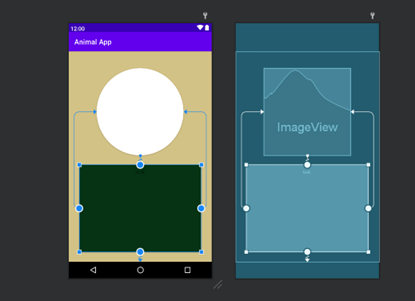
Insert Cardview to make Cardview circular use attribute
app:CardCornerRadius=”125”
tools:text=”toolsText” is used only for Android Studio layout preview, it doesn’t show text when you run an app.
Design:
img.setImageResource(intent.getIntExtra(“image”,R.drawable.ic_launcher_foreground)
If image key is not find then this (R.drawable.ic_launcher_foreground) image is displayed.
onItemClick method in MainActivity modified.
Kotlin:
package com.rishiz.animalapp

import android.os.Bundle
import android.widget.ImageView
import android.widget.TextView
import androidx.appcompat.app.AppCompatActivity
import net.rishiz.ktapp.R

class AnimalInfo : AppCompatActivity() {
    private var img: ImageView? = null
    private var txt: TextView? = null
    override fun onCreate(savedInstanceState: Bundle?) {
        super.onCreate(savedInstanceState)
        setContentView(R.layout.activity_animal_info)
        img = findViewById<ImageView>(R.id.imgCircle)
        txt = findViewById<TextView>(R.id.txt)
        val intent = intent
        img?.setImageResource(intent.getIntExtra("image", R.drawable.ic_launcher_foreground))
        txt?.text = intent.getStringExtra("name")
    }
}
Java:
package com.rishiz.animalapp;

import androidx.appcompat.app.AppCompatActivity;

import android.content.Intent;
import android.os.Bundle;
import android.widget.ImageView;
import android.widget.TextView;

public class AnimalInfo extends AppCompatActivity {
    ImageView img;
    TextView txt;

    @Override
    protected void onCreate(Bundle savedInstanceState) {
        super.onCreate(savedInstanceState);
        setContentView(R.layout.activity_animal_info);

        img=findViewById(R.id.imgCircle);
        txt=findViewById(R.id.txt);

        Intent intent=getIntent();
        img.setImageResource(intent.getIntExtra("image",R.drawable.ic_launcher_foreground));
        txt.setText(intent.getStringExtra("name"));
    }
Github link: https://github.com/rishizni/android-animal_app