How to run app in Android Studio
To run an Android app in Android Studio You have two options.
- The first option is to run them on a physical device.
- But what if you want to see how it looks on a type of device you do not have?
2.This is where Android Emulators come into the picture.
Android Virtual Device
The emulator is an application that recreates the hardware environment of an Android device: from its CPU and memory to the video display and sound chips.
The emulator is built on an existing emulator called QEMU, which is similar to other Virtual Machine applications that you might have used, such as VirtualBox or VMWare.
The Android emulator is built into the Android SDK and allows you to set up one or more Android Virtual Devices (AVDs), which enables you to run your app as if it were running on a physical device.
Many AVDs can be set up, each emulating a different device type.
Creating a New AVD in Android Studio
Select Tools > Device Manager > Create Device > Phone/tablet (select the device you want to choose) > Next > System image (API level) > Finish.

In the Hardware Profile page, select a hardware type for the virtual device.

In the System Image page, select a System Image for a particular API level, and click Next.
This will help run the Android version for the newly created virtual device.
- If a system image unavailable, you need to download one.

In the Verify Configuration page, set the AVD properties as desired, and then click Finish.

Phew! AVD Manager will now list the newly created virtual device in the Your Virtual Devices page or the Select Deployment Target dialog.

Now let’s run the app by click on the run button in android studio.

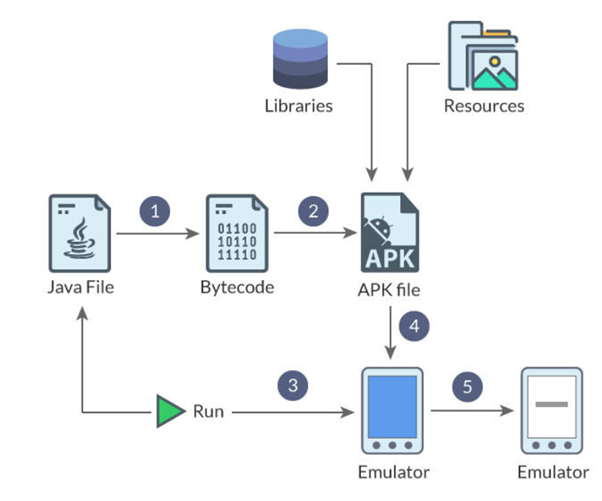
Compile, Package, Deploy, and Run

The above image illustrates the different preliminary tasks that need to be carried out to get the application running.
n APK file is an Android application package. It is a JAR or ZIP file for Android applications.
- The Java source files are compiled to bytecode.
- An Android application package, or APK file, gets created.
- The APK file comprises of the compiled Java files, along with the libraries and resources that the app might need.
- Assuming there is no app running already, the emulator will be launched, which then runs the AVD.
- Once the emulator has been launched, and the AVD is active, the APK file is uploaded and installed in the AVD.
- The AVD starts the main activity associated with the app.
Connecting Real Devices
Step 1: Prepare the device.
- Enable Developer Mode
- Navigate to Settings > About Phone and tap the Build Number 7 times till the message “You’re now a developer” is displayed. (Number of tapings is depend on devices)
- Enable USB Debugging
- Go back to Settings > Developer options and turn on USB Debugging
Step 2:Once USB debugging is enabled, you are all set to connect your device and run the app from the Android Studio.
Connect your device and run the app
- Connect your Android device to your development machine with the help of a USB cable.
- Run the app by choosing Run → Run ‘app’ or by clicking the Run button in the toolbar.
- The Select Deployment Target window opens with the list of available emulators and connected devices.
- Select your device and click OK.
Android Studio will install the app on your device and launch it.
Your app will look the same as when you ran it through the emulator. But the app might install and run quicker.
Next: Android Layouts


[…] Next: How to run app in android studio. […]