Weather App in Android using Retrofit
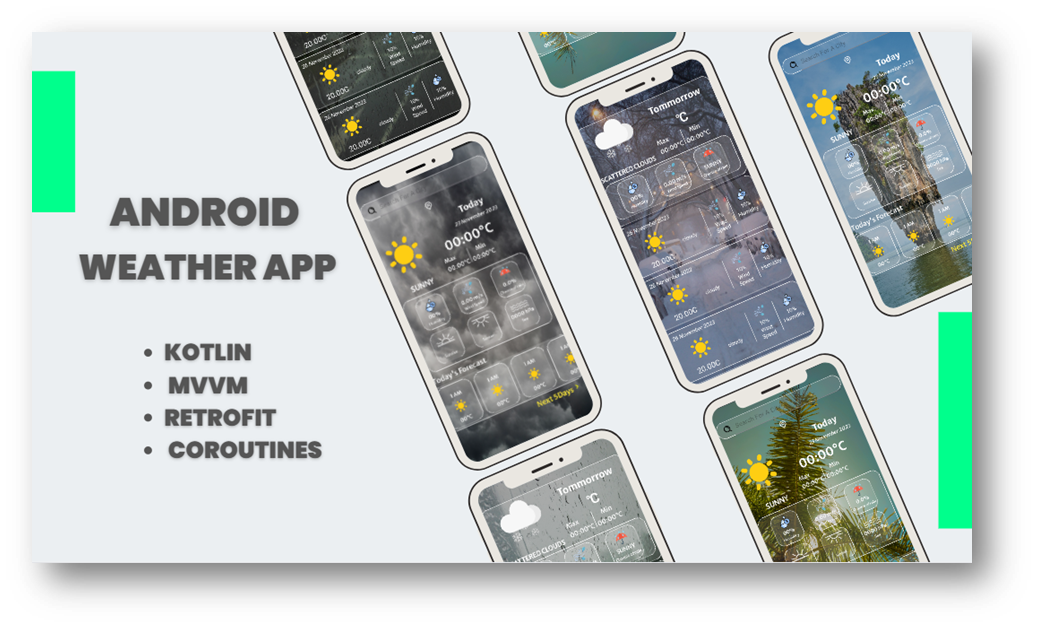
Weather app in Android have become an essential tool for individuals looking to plan their daily activities, travel, and stay informed about changing weather conditions. Developing a weather forecasting app for Android devices allows users to access accurate and up-to-date weather information right at their fingertips.
Table of Contents
Prerequisite
Just go through the GitHub code while understanding.
Understanding Weather Forecasting Data
Weather forecasting apps rely on various data sources, including meteorological organizations, satellites, and weather APIs. The key aspects to consider include:
Choosing a Weather Data Provider API:
- Explore available weather APIs such as OpenWeatherMap, Weather API, or AccuWeather, and select one that best suits your app’s requirements.
API Documentation Review:
- Familiarize yourself with the types of weather data available, such as current conditions, forecasts (hourly and daily), temperature, humidity, wind speed, precipitation, and more.
- Dive into the API documentation to understand endpoints, parameters, and response formats. This knowledge will drive data retrieval for your app.
App’s Features of Weather App
- location-based weather updates
- 3-hour step daily forecasts
- 5-day forecast
User Interface Design
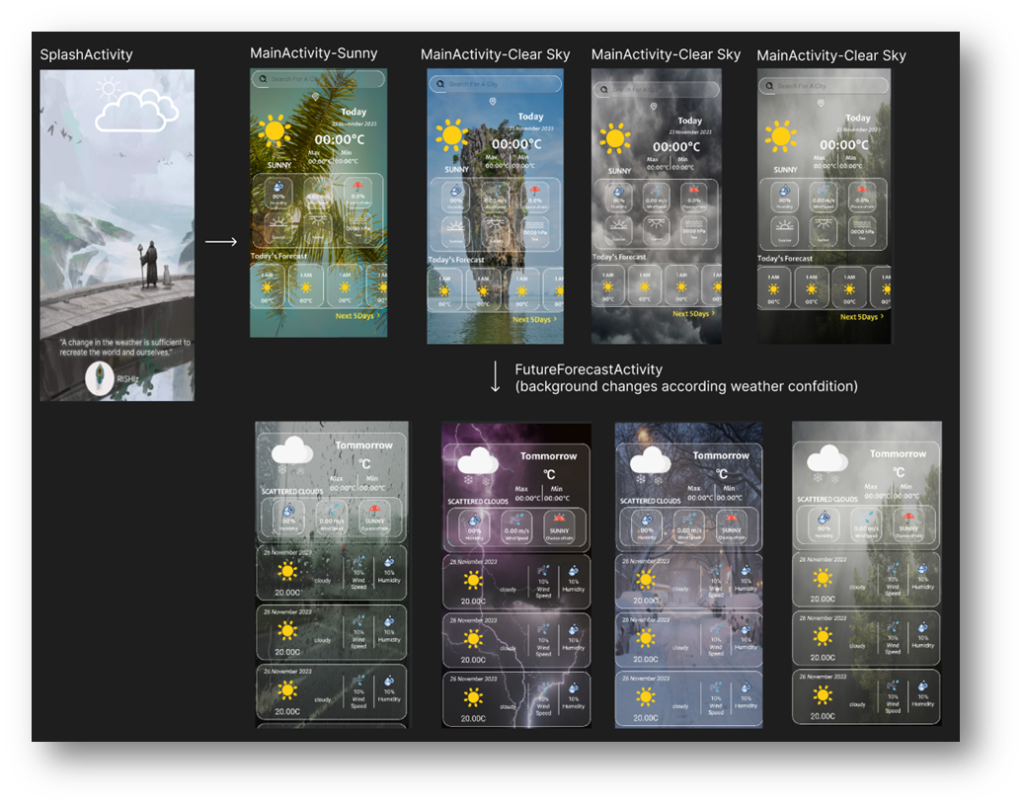
There are three screens (or activities) in the app: SplashActivity, MainActivity, and FutureForecastingActivity. The background of each screen changes based on the weather conditions.
Splash screen layout
1. Open the activity_splash.xml file.
2. In the root layout, add a background using the following code: android:background=”@drawable/splash_screen”
3. Add an ImageView to display a white cloud. Adjust the height and width as per your requirements.
4. To display an image in the ImageView, use the android:src attribute with the appropriate image URL or file location. The code will look like this:
android:src=”@drawable/white_cloud”
activity_splash.xml
<?xml version="1.0" encoding="utf-8"?>
<androidx.constraintlayout.widget.ConstraintLayout xmlns:android="http://schemas.android.com/apk/res/android"
    xmlns:app="http://schemas.android.com/apk/res-auto"
    xmlns:tools="http://schemas.android.com/tools"
    android:layout_width="match_parent"
    android:layout_height="match_parent"
    android:background="@drawable/splash_screen"
    tools:context=".view.activity.SplashActivity">

    <ImageView
        android:id="@+id/imageView"
        android:layout_width="wrap_content"
        android:layout_height="wrap_content"
        android:layout_marginTop="16dp"
        android:src="@drawable/white_cloud"
        app:layout_constraintEnd_toEndOf="parent"
        app:layout_constraintHorizontal_bias="0.77"
        app:layout_constraintStart_toStartOf="parent"
        app:layout_constraintTop_toTopOf="parent" />
</androidx.constraintlayout.widget.ConstraintLayout>
MainActivity layout
Open the activity_main.xml file and set the background, for now, set any weather condition background. This will be updated later according to the conditions.
SearchView:

To make the SearchView look like the required UI, create a shape. To create a shape file, right-click on the drawable folder and select new, then drawable resource file.
Select the root layout as a shape while creating the file or change the root layout in XML and set the solid, stroke, and corners elements.

Set the SearchView background to implement this shape.
android:background=”@drawable/searchviewshape”
Set search icon using app:searchIcon=”@drawable/search”
Add hint in search app:queryHint=”Search For A City”
To display this hint we have to set the iconfieldByDefault attribute.
app:iconifiedByDefault=”false”
TextView for the location name
Include textview and constraint its start to start of parent and end to end of parent , its top to bottom of SearchVieww, give margin-top.
By default the text is null.
To show the location icon on the left side use drawableLeft and assign the icon.
android:drawableLeft=”@drawable/location”
Use drawable padding for space in between icon and text.
android:drawablePadding=”15dp”
<TextView
        android:id="@+id/cityName"
        android:layout_width="wrap_content"
        android:layout_height="wrap_content"
        android:layout_marginTop="10dp"
        android:drawableLeft="@drawable/location"
        android:drawablePadding="15dp"
        android:fontFamily="@font/merriweathersans_medium"
        android:text="@{viewModel.cityName}"
        android:textColor="@color/white"
        android:textSize="20sp"
        app:layout_constraintEnd_toEndOf="parent"
        app:layout_constraintStart_toStartOf="parent"
        app:layout_constraintTop_toBottomOf="@+id/searchView" />
This textview UI will update through ViewModel so we are using data binding here, will come later on this.
android:text=”@{viewModel.cityName}
Create a font folder in the res and add your font there, access these fonts as below,
android:fontFamily=”@font/merriweathersans_medium”
LottieAnimationView
Instead of using a static icon, we will use AnimationView to display the weather conditions. This will enhance the user experience. To implement animated views, we are using the Lottie library.
Lottie is an animation library by Airbnb that allows you to render Adobe After Effects animations in real-time in your Android, iOS, web, and other platforms.
It uses JSON-based animation files exported from After Effects using the Bodymovin plugin, enabling rich, interactive animations within your apps.
Integration Steps for Lottie in Android:
1. Add Lottie Dependency: In your app-level build.gradle file, include the Lottie library:
dependencies {
    implementation 'com.airbnb.android:lottie: 6.2.0 // Use the latest version
}
get the Lottie-android dependency here
2. Include Lottie Animation
You can either use Lottie’s pre-built animations from their website or create your animations in Adobe After Effects and export them using the Bodymovin plugin.
For our project, we will search for the weather conditions animation on the website and download. The downloaded file is in JSON format.
Create a raw folder in res and add these JSON files in it.
3. Place Lottie Animation View
Add a LottieAnimationView to your layout file where you want the animation to appear
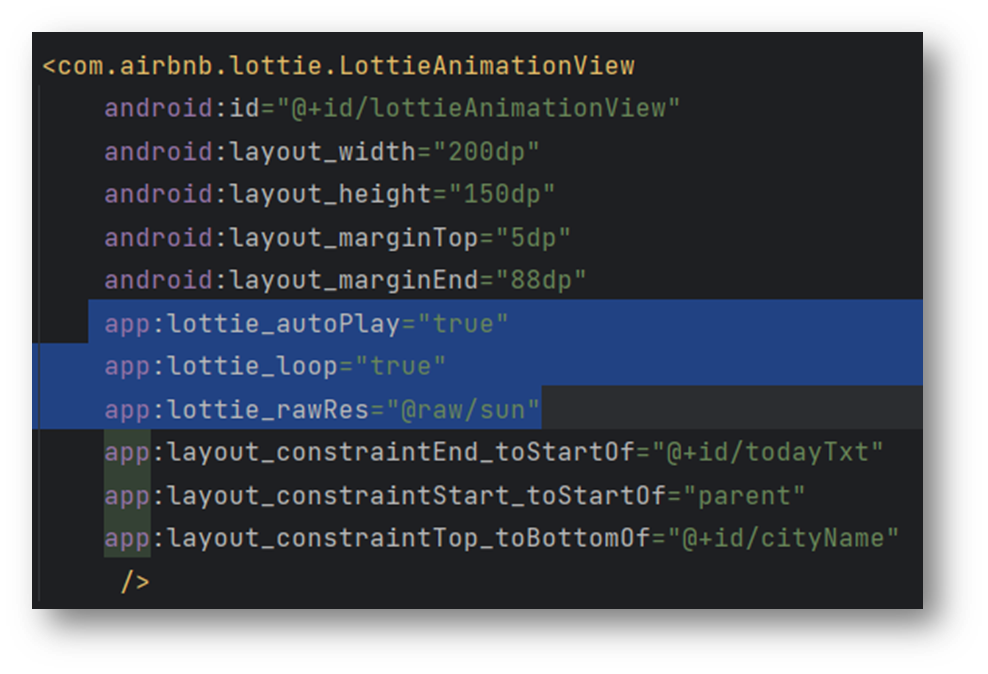
Replace @raw/sun with the name of your animation file.
app:lottie_rawRes takes the animated file which is kept in the raw folder
app:lottie_autoPlay will start the animation automatically
app_lottie_loop=”true” means the animation will continuously run in loop
4. Play and Control Animation:
LottieAnimationView animationView = findViewById(R.id.lottieAnimationView);

// Start the animation
animationView.playAnimation();

// Control animation states (e.g., pause, resume)
animationView.pauseAnimation();
animationView.resumeAnimation();

// Control loop behavior
animationView.setRepeatCount(LottieDrawable.INFINITE); // Set to loop indefinitely
this step will be done later.
TextView for weather condition
Place the textview below the lottieAnimationView and constrain its start and end to the start and end of lottieAnimationView, respectively.
Provide the required margin-top, textAllcaps, font size, and font color as per the specifications.
<TextView
    android:id="@+id/weather"
    android:layout_width="wrap_content"
    android:layout_height="wrap_content"
    android:layout_marginTop="5dp"
    android:fontFamily="@font/merriweathersans_regular"
    android:text="sunny"
    android:textAllCaps="true"
    android:textColor="#FFFFFF"
    android:textSize="20sp"
    android:textStyle="bold"
    app:layout_constraintEnd_toEndOf="@+id/lottieAnimationView"
    app:layout_constraintStart_toStartOf="parent"
    app:layout_constraintTop_toBottomOf="@+id/lottieAnimationView" />
TextView for “Today” text
Constraint the top of the textview to the bottom of the city name text view, constraint start to end of lottieAnimationView set other property as per requirement.
TextView for Date
Just below TextView ‘Today’ place this TextView to display the Date and constraint the top to bottom of, end to end of, and start to start of @+id/todayTxt respectively.
Give margin-top, set text style, and font.
<TextView
    android:id="@+id/date"
    android:layout_width="wrap_content"
    android:layout_height="wrap_content"
    android:layout_marginTop="5dp"
    android:text="23 November 2023"
    android:textStyle="italic"
    android:textColor="#FFFFFF"
    android:fontFamily="@font/merriweathersans_regular"
    app:layout_constraintTop_toBottomOf="@+id/todayTxt"
    app:layout_constraintEnd_toEndOf="@+id/todayTxt"
    app:layout_constraintStart_toStartOf="@+id/todayTxt"
    tools:layout_editor_absoluteY="166dp" />
TextView for Temperature
To make the temperature display below the date and to the right of the LottieAnimation,constraint the start to end of weather conditon TextView,top to bottom of date.
set the size of the text to 34sp and adjust the other attributes as needed.
<TextView
    android:id="@+id/temp"
    android:layout_width="wrap_content"
    android:layout_height="wrap_content"
    android:layout_marginTop="4dp"
    android:fontFamily="@font/merriweathersans_semibold"
    android:text="00:00°C"
    android:textColor="#FFFFFF"
    android:textSize="34sp"
    app:layout_constraintEnd_toEndOf="parent"
    app:layout_constraintStart_toEndOf="@+id/weather"
    app:layout_constraintTop_toBottomOf="@+id/date" />
Max/Min Temperature

To display maximum and minimum temperature, we will use two linearLayouts nested inside one linearLayout. For the vertical line, we will add a view element with the height, width, and color attributes.
Constraint the outer LinearLayout with temperature textview.
<LinearLayout
    android:layout_width="wrap_content"
    android:layout_height="wrap_content"
    android:layout_marginEnd="36dp"
    app:layout_constraintStart_toStartOf="@+id/temp"
    app:layout_constraintEnd_toEndOf="@+id/temp"
    app:layout_constraintTop_toBottomOf="@+id/temp">
    <LinearLayout
        android:layout_width="match_parent"
        android:layout_height="wrap_content"
        android:layout_weight="1"
        android:orientation="vertical">
        <TextView
            android:layout_width="wrap_content"
            android:layout_height="wrap_content"
            android:fontFamily="@font/merriweathersans_regular"
            android:text="Max"
            android:textColor="#FFFFFF"
            android:textSize="16sp"
            />

        <TextView
            android:id="@+id/max_temp"
            android:layout_width="wrap_content"
            android:layout_height="wrap_content"
            android:fontFamily="@font/merriweathersans_regular"
            android:text="00:00°C"
            android:textColor="#FFFFFF"
            android:textSize="16sp"
            />

    </LinearLayout>
    <View
        android:layout_width="1dp"
        android:layout_height="match_parent"
        android:layout_margin="4dp"
        android:background="@color/white" />

    <LinearLayout
        android:layout_width="match_parent"
        android:layout_height="wrap_content"
        android:layout_weight="1"
        android:gravity="center"
        android:orientation="vertical">

        <TextView
            android:layout_width="wrap_content"
            android:layout_height="wrap_content"
            android:fontFamily="@font/merriweathersans_regular"
            android:text="Min"
            android:textColor="#FFFFFF"
            android:textSize="16sp"
            />

        <TextView
            android:id="@+id/min_temp"
            android:layout_width="wrap_content"
            android:layout_height="wrap_content"
            android:fontFamily="@font/merriweathersans_regular"
            android:text="00:00°C"
            android:textColor="#FFFFFF"
            android:textSize="16sp"/>

    </LinearLayout>

</LinearLayout>
When you set android:layout_weight=”1″ on a child view inside a LinearLayout, it means that the view will expand to fill the available space equally among other views with the same attribute within the same parent LinearLayout.
Design Layout to display weather data
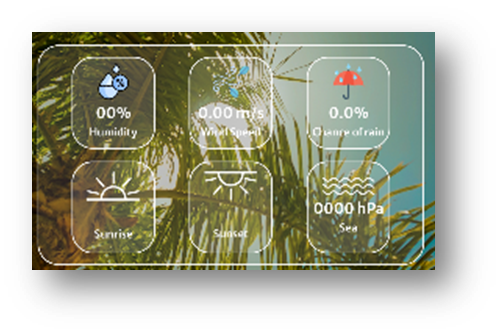
Include FrameLayout and constraint the top to bottom of weather condition textview and other with the parent.
Give margin-top, start and end 10 dp, and height/width as per requirement.
<FrameLayout
    android:id="@+id/summaryLayout"
    android:layout_width="370dp"
    android:layout_height="210dp"
    android:layout_marginStart="10dp"
    android:layout_marginTop="10dp"
    android:layout_marginEnd="10dp"
    android:background="@drawable/bg_shape"
    app:layout_constraintEnd_toEndOf="parent"
    app:layout_constraintStart_toStartOf="parent"
    app:layout_constraintTop_toBottomOf="@+id/weather">
Create background shape to create a shape file right click on drawable folder-> new->drawable resource file, name it bg_shape, and select root layout shape.
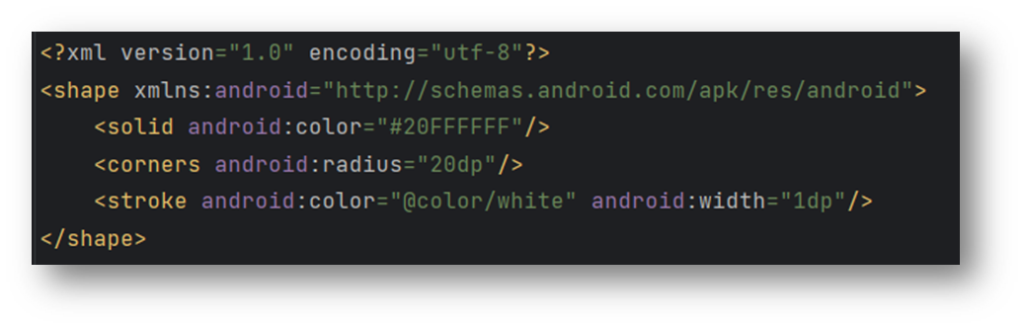
In color “#20FFFFFF” represents the transparency of the color.
Include the ConstraintLayout inside the FrameLayout. Then, add LinearLayouts for each data inside the ConstraintLayout.
In LinearLayout add ImageView and two textviews,set the height of the LinearLayout to 88dp, width to 80dp, and background, Set the gravity to center and the orientation to vertical.
Inside ImageView, add a picture by setting the value of “app:srcCompat”, and set the gravity of the textview center and font as per requirement.
<LinearLayout
    android:id="@+id/linearLayout"
    android:layout_width="80dp"
    android:layout_height="88dp"
    android:background="@drawable/bg_shape"
    android:gravity="center"
    android:orientation="vertical"
    tools:layout_editor_absoluteX="1dp"
    tools:layout_editor_absoluteY="1dp">

    <ImageView
        android:layout_width="match_parent"
        android:layout_height="wrap_content"
        app:srcCompat="@drawable/humidity" />

    <TextView
        android:id="@+id/humidity"
        android:layout_width="match_parent"
        android:layout_height="wrap_content"
        android:fontFamily="@font/merriweathersans_medium"
        android:gravity="center"
        android:text="00%"
        android:textColor="#FFFFFF" />

    <TextView
        android:layout_width="match_parent"
        android:layout_height="wrap_content"
        android:layout_marginBottom="2dp"
        android:fontFamily="@font/merriweathersans_medium"
        android:gravity="center"
        android:text="Humidity"
        android:textColor="#FFFFFF"
        android:textSize="10sp" />
</LinearLayout>
This is linearLayout is for humidity and the same for the other five weather data.
Final FrameLayout code:
<androidx.constraintlayout.widget.ConstraintLayout
        android:layout_width="match_parent"
        android:layout_height="match_parent">

        <androidx.constraintlayout.helper.widget.Flow
            android:layout_width="0dp"
            android:layout_height="0dp"
            android:orientation="horizontal"
            app:constraint_referenced_ids="linearLayout,linearLayout2,linearLayout3,linearLayout4,linearLayout5,linearLayout6"
            app:flow_maxElementsWrap="3"
            app:flow_wrapMode="chain"
            app:layout_constraintBottom_toBottomOf="parent"
            app:layout_constraintEnd_toEndOf="parent"
            app:layout_constraintStart_toStartOf="parent"
            app:layout_constraintTop_toTopOf="parent" />

        <LinearLayout
            android:id="@+id/linearLayout"
            android:layout_width="80dp"
            android:layout_height="88dp"
            android:background="@drawable/bg_shape"
            android:gravity="center"
            android:orientation="vertical"
            tools:layout_editor_absoluteX="1dp"
            tools:layout_editor_absoluteY="1dp">

            <ImageView
                android:layout_width="match_parent"
                android:layout_height="wrap_content"
                app:srcCompat="@drawable/humidity" />

            <TextView
                android:id="@+id/humidity"
                android:layout_width="match_parent"
                android:layout_height="wrap_content"
                android:fontFamily="@font/merriweathersans_medium"
                android:gravity="center"
                android:text="00%"
                android:textColor="#FFFFFF" />

            <TextView
                android:layout_width="match_parent"
                android:layout_height="wrap_content"
                android:layout_marginBottom="2dp"
                android:fontFamily="@font/merriweathersans_medium"
                android:gravity="center"
                android:text="Humidity"
                android:textColor="#FFFFFF"
                android:textSize="10sp" />
        </LinearLayout>

        <LinearLayout
            android:id="@+id/linearLayout2"
            android:layout_width="80dp"
            android:layout_height="88dp"
            android:background="@drawable/bg_shape"
            android:gravity="center"
            android:orientation="vertical"
            tools:layout_editor_absoluteX="1dp"
            tools:layout_editor_absoluteY="1dp">

            <ImageView

                android:layout_width="match_parent"
                android:layout_height="wrap_content"
                app:srcCompat="@drawable/wind" />

            <TextView
                android:id="@+id/windspeed"
                android:layout_width="match_parent"
                android:layout_height="wrap_content"
                android:fontFamily="@font/merriweathersans_medium"
                android:gravity="center"
                android:text="0.00 m/s"
                android:textColor="#FFFFFF" />

            <TextView

                android:layout_width="match_parent"
                android:layout_height="wrap_content"
                android:layout_marginBottom="2dp"
                android:fontFamily="@font/merriweathersans_medium"
                android:gravity="center"
                android:text="Wind Speed"
                android:textColor="#FFFFFF"
                android:textSize="10sp" />
        </LinearLayout>

        <LinearLayout
            android:id="@+id/linearLayout3"
            android:layout_width="80dp"
            android:layout_height="88dp"
            android:background="@drawable/bg_shape"
            android:gravity="center"
            android:orientation="vertical"
            tools:layout_editor_absoluteX="1dp"
            tools:layout_editor_absoluteY="1dp">

            <ImageView

                android:layout_width="match_parent"
                android:layout_height="wrap_content"
                app:srcCompat="@drawable/rain" />

            <TextView
                android:id="@+id/chanceofrain"
                android:layout_width="match_parent"
                android:layout_height="wrap_content"
                android:fontFamily="@font/merriweathersans_medium"
                android:gravity="center"
                android:text="0.0%"
                android:textColor="#FFFFFF" />

            <TextView

                android:layout_width="match_parent"
                android:layout_height="wrap_content"
                android:layout_marginBottom="2dp"
                android:fontFamily="@font/merriweathersans_medium"
                android:gravity="center"
                android:text="Chance of rain"
                android:textColor="#FFFFFF"
                android:textSize="10sp" />
        </LinearLayout>

        <LinearLayout
            android:id="@+id/linearLayout4"
            android:layout_width="80dp"
            android:layout_height="88dp"
            android:background="@drawable/bg_shape"
            android:gravity="center"
            android:orientation="vertical"
            tools:layout_editor_absoluteX="1dp"
            tools:layout_editor_absoluteY="1dp">

            <ImageView

                android:layout_width="match_parent"
                android:layout_height="wrap_content"
                app:srcCompat="@drawable/sunrise" />

            <TextView
                android:id="@+id/sunrise"
                android:layout_width="match_parent"
                android:layout_height="wrap_content"
                android:fontFamily="@font/merriweathersans_medium"
                android:gravity="center"
                android:text="@{viewModel.sunrise}"
                android:textColor="#FFFFFF" />

            <TextView

                android:layout_width="match_parent"
                android:layout_height="wrap_content"
                android:layout_marginBottom="2dp"
                android:fontFamily="@font/merriweathersans_medium"
                android:gravity="center"
                android:text="Sunrise"
                android:textColor="#FFFFFF"
                android:textSize="10sp" />
        </LinearLayout>

        <LinearLayout
            android:id="@+id/linearLayout5"
            android:layout_width="80dp"
            android:layout_height="88dp"
            android:background="@drawable/bg_shape"
            android:gravity="center"
            android:orientation="vertical"
            tools:layout_editor_absoluteX="1dp"
            tools:layout_editor_absoluteY="1dp">

            <ImageView
                android:layout_width="match_parent"
                android:layout_height="wrap_content"
                app:srcCompat="@drawable/sunset" />

            <TextView
                android:id="@+id/sunset"
                android:layout_width="match_parent"
                android:layout_height="wrap_content"
                android:fontFamily="@font/merriweathersans_medium"
                android:gravity="center"
                android:text="@{viewModel.sunset}"
                android:textColor="#FFFFFF" />

            <TextView

                android:layout_width="match_parent"
                android:layout_height="wrap_content"
                android:layout_marginBottom="2dp"
                android:fontFamily="@font/merriweathersans_medium"
                android:gravity="center"
                android:text="Sunset"
                android:textColor="#FFFFFF"
                android:textSize="10sp" />
        </LinearLayout>

        <LinearLayout
            android:id="@+id/linearLayout6"
            android:layout_width="80dp"
            android:layout_height="88dp"
            android:background="@drawable/bg_shape"
            android:gravity="center"
            android:orientation="vertical"
            tools:layout_editor_absoluteX="1dp"
            tools:layout_editor_absoluteY="1dp">

            <ImageView

                android:layout_width="match_parent"
                android:layout_height="wrap_content"
                app:srcCompat="@drawable/sea" />

            <TextView
                android:id="@+id/sea"
                android:layout_width="match_parent"
                android:layout_height="wrap_content"
                android:fontFamily="@font/merriweathersans_medium"
                android:gravity="center"
                android:text="0000 hPa"
                android:textColor="#FFFFFF" />

            <TextView

                android:layout_width="match_parent"
                android:layout_height="wrap_content"
                android:layout_marginBottom="2dp"
                android:fontFamily="@font/merriweathersans_medium"
                android:gravity="center"
                android:text="Sea"
                android:textColor="#FFFFFF"
                android:textSize="10sp" />
        </LinearLayout>
    </androidx.constraintlayout.widget.ConstraintLayout>
</FrameLayout>
To show the linearlayouts in grid form constrainLayout has the property name as flow.
androidx.constraintlayout.helper.widget
The Flow helper widget in androidx.constraintlayout.helper.widget is a part of the ConstraintLayout library in Android. It’s designed to assist in arranging multiple views dynamically within a ConstraintLayout, facilitating the creation of flexible and adaptive layouts that adjust to available space.
Implementation:
<androidx.constraintlayout.helper.widget.Flow
    android:layout_width="0dp"
    android:layout_height="0dp"
    android:orientation="horizontal"
    app:constraint_referenced_ids="linearLayout,linearLayout2,linearLayout3,linearLayout4,linearLayout5,linearLayout6"
    app:flow_maxElementsWrap="3"
    app:flow_wrapMode="chain"
    app:layout_constraintBottom_toBottomOf="parent"
    app:layout_constraintEnd_toEndOf="parent"
    app:layout_constraintStart_toStartOf="parent"
constraint_referenced_ids: Refers to the IDs of views that will be included within the flow.
flow_wrapMode: Specifies how views wrap within the flow (chain, aligned, packed, etc.).
flow_maxElementWrap:no of element after which wrap
flow_horizontalGap and flow_verticalGap: Define the spacing between views horizontally and vertically, respectively.
flow_horizontalStyle and flow_verticalStyle: Define the style of arrangement for views (spread, spread_inside, packed, etc.).
Design UI for Today’s Forecast

Place a TextView below the FrameLayout displaying “Today’s Forecast”.
Include a FrameLayout with bg_shape background and add the RecyclerView inside it. Add a TextView below this FrameLayout with the text “Next 5 Days”.
<FrameLayout
    android:id="@+id/frameLayout"
    android:layout_width="400dp"
    android:layout_height="130dp"
    android:layout_marginTop="5dp"
    android:layout_marginStart="5dp"
    android:layout_marginEnd="5dp"
    android:background="@drawable/bg_shape"
    app:layout_constraintEnd_toEndOf="parent"
    app:layout_constraintStart_toStartOf="parent"
    app:layout_constraintTop_toBottomOf="@+id/day">

    <androidx.recyclerview.widget.RecyclerView
        android:id="@+id/recyclerview"
        android:layout_width="match_parent"
        android:layout_height="match_parent"
        android:orientation="horizontal"
        app:layoutManager="androidx.recyclerview.widget.LinearLayoutManager"
        tools:listitem="@layout/today_weather_row" />
</FrameLayout>
Design row layout for recyclerview
Use framelayout as root layout with background bg_shape inside this add linearlayout.
In linearlayout add the TextView, LottieAnimationView.
<?xml version="1.0" encoding="utf-8"?>
<FrameLayout xmlns:android="http://schemas.android.com/apk/res/android"
    xmlns:app="http://schemas.android.com/apk/res-auto"
    android:layout_width="wrap_content"
    android:layout_height="wrap_content"
    android:background="@drawable/bg_shape"
    android:layout_margin="5dp">


    <LinearLayout
        android:id="@+id/linearLayout"
        android:layout_width="100dp"
        android:layout_height="130dp"
        android:gravity="center"
        android:orientation="vertical"
        app:layout_constraintStart_toStartOf="parent"
        app:layout_constraintTop_toTopOf="parent">

        <TextView
            android:id="@+id/time"
            android:layout_width="match_parent"
            android:layout_height="wrap_content"
            android:fontFamily="@font/merriweathersans_medium"
            android:gravity="center"
            android:text="1 AM"
            android:textColor="#FFFFFF" />

        <com.airbnb.lottie.LottieAnimationView
            android:id="@+id/timelottieAnimation"
            android:layout_width="80dp"
            android:layout_height="50dp"
            app:lottie_autoPlay="true"
            app:lottie_loop="true"
            app:lottie_rawRes="@raw/sun" />

        <TextView
            android:id="@+id/tempAtTime"
            android:layout_width="match_parent"
            android:layout_height="wrap_content"
            android:fontFamily="@font/merriweathersans_medium"
            android:gravity="center"
            android:text="00°C"
            android:textColor="#FFFFFF" />
    </LinearLayout>
</FrameLayout>
Update the size, font, style, and other attributes of view by UI layout editor or by changes in XML.
Transparent overlay
The view element is added for transparent overlay to reduce the brightness of the background image so that text visibility is clear to the user.

FutureForecastActivity UI design
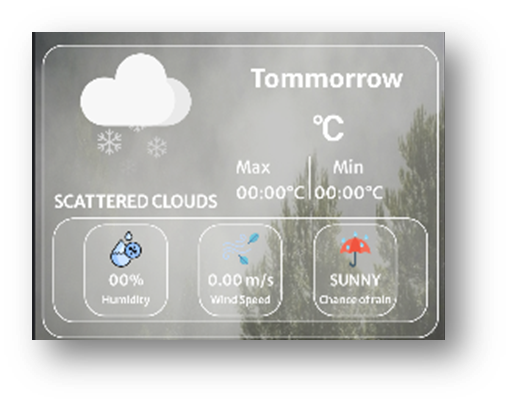
This user interface displays the weather data for tomorrow and is similar to the main activity UI.
Simply add the FrameLayout that displays the other weather data inside the ConstraintLayout with only three weather data. Adjust the other attributes as needed.
Below this layout, add a RecyclerView to display the weather forecast for the upcoming days.
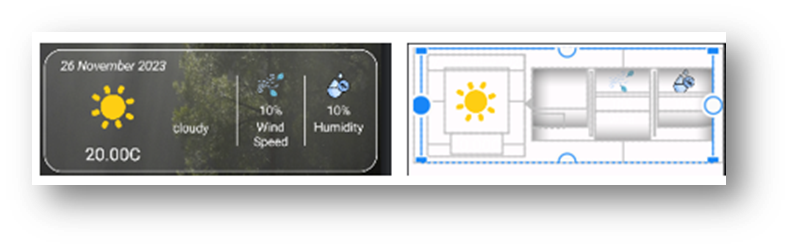
Future forecast row
Create a layout resource file.
To create a layout resource file, follow these steps:
1. Create a RelativeLayout inside the layout file.
2. Inside this RelativeLayout, add another RelativeLayout to show the date, Lottie animation, and temperature. Set the margin for this to 8dp and set other view attributes as needed.
3. Add a LinearLayout inside the outer RelativeLayout. Inside this LinearLayout, add three more LinearLayouts with a vertical orientation. These layouts are separated by a line (which is a view).
4. Add the views as per the required design in each linear layout.
OpenWeatherMap API
We are using the OpenWeatherMap API to retrieve weather data.
1. Sign Up and Obtain an API Key:
To access the OpenWeatherMap API, sign up on their website(Weather API – OpenWeatherMap) and obtain an API key. This key is essential for authenticating your app’s requests to the API.
2. Select the appropriate API:
Go to API section and select the API as per needs, our project utilizes the 5 Days/3 Hour Forecast API.
3. API Documentation Review:( 5 day weather forecast – OpenWeatherMap)
Dive into API documentation to understand endpoints, parameters, and response formats.
When you read the documentation, you will discover various ways of API requests.
4. Ways of Built-in API requests.
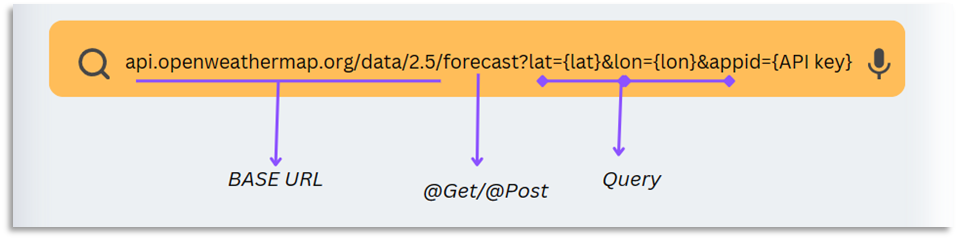
- By latitude and longitude (these values obtain through LOCATION_SERVICE)
api.openweathermap.org/data/2.5/forecast?lat={lat}&lon={lon}&appid={API key}
- By city name
api.openweathermap.org/data/2.5/forecast?q={city name}&appid={API key}
Implementing API Using Retrofit
Why choose this library only?

please refer to this post.
1. Add Dependencies:
Update your build.gradle file to include the Retrofit and Gson dependencies:
    // Retrofit for handling API requests
    implementation 'com.squareup.retrofit2:retrofit:2.9.0'
    implementation 'com.squareup.retrofit2:converter-gson:2.9.0' // Gson converter for JSON serialization/deserialization

    // For coroutines support
    implementation 'org.jetbrains.kotlinx:kotlinx-coroutines-android:1.5.2'
}
2. Model Classes:
Create a data class to represent the structure of the data you expect to receive from the API:
To create model class use JSON to Kotlin class plugin.
Why plugin?
Efficiency: Manually creating Kotlin data classes based on JSON structures can be time-consuming and error-prone. These plugins automate the process, saving considerable development time.
Accuracy: Plugins generate Kotlin data classes that precisely match the JSON structure, reducing the chances of typos or mistakes when writing classes manually.
To install a plugin in the Android studio go to setting->plugin search and install it.
To get JSON Data enter the API URL in the browser with the appropriate parameter.

You will get the following response.

Create the package model and open the plugin editor by right-clicking on this folder.
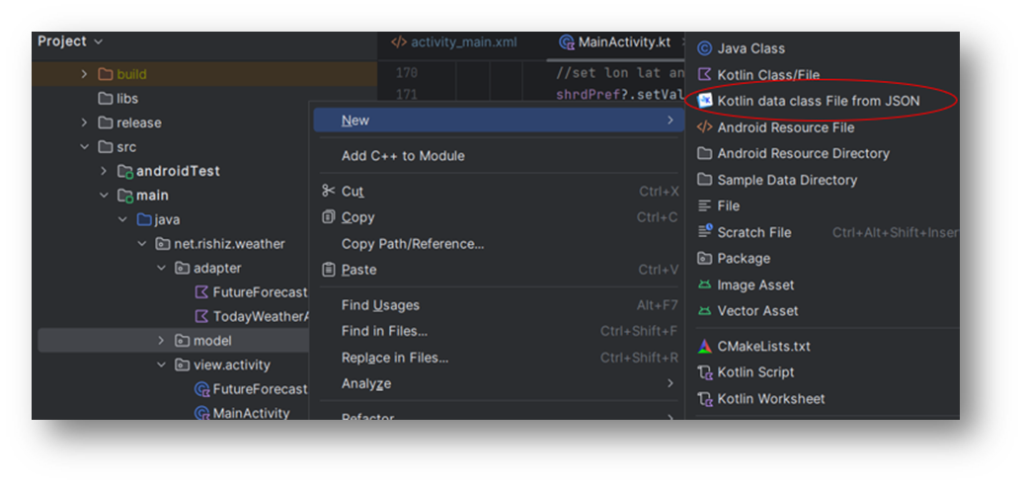
Copy this JSON data and paste it into the editor to convert this data into data classes.
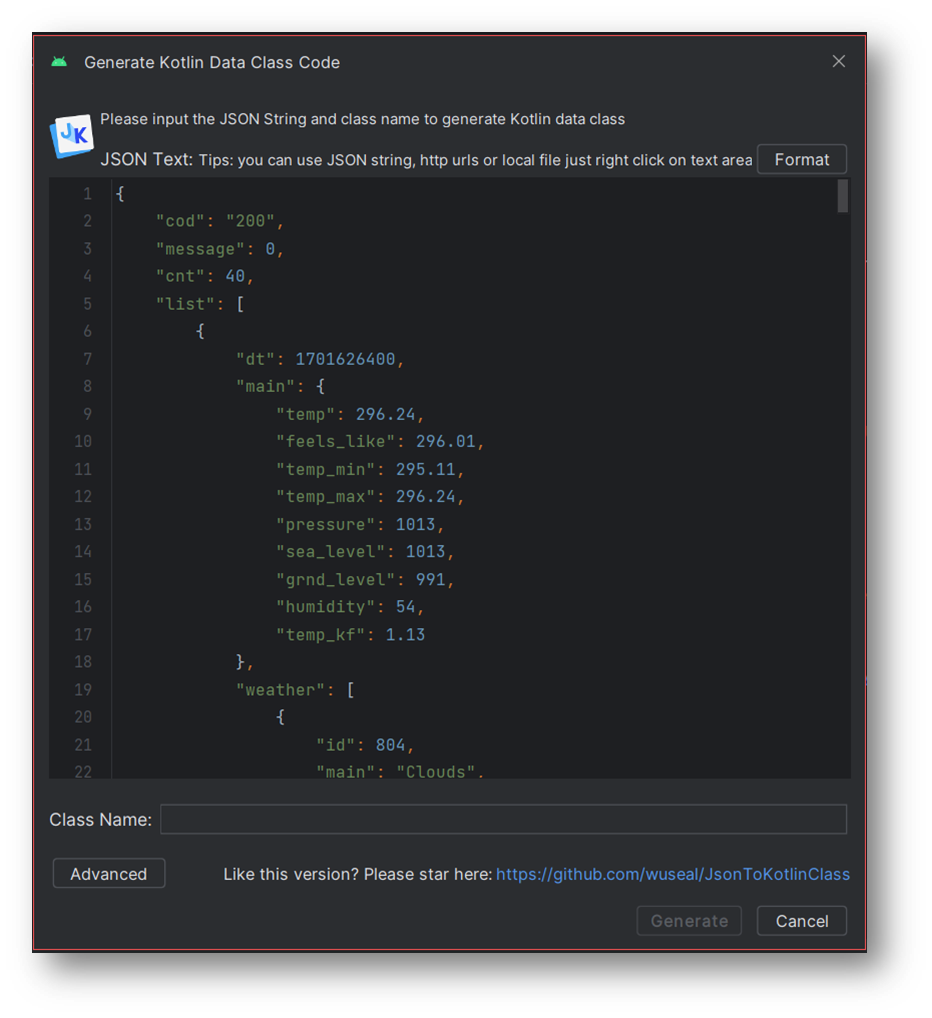
format it by clicking on format give the class name and click on the generate button.
3. Create Retrofit Instance:
Create a Retrofit instance that will serve as the entry point for API calls. Set up the base URL and specify converters.
object RetrofitInstance {

    val retrofit: ApiInterface = Retrofit.Builder()
        .baseUrl(Utils.BASE_URL)
        .addConverterFactory(GsonConverterFactory.create())
        .build().create(ApiInterface::class.java)
}
Retrofit.Builder()
Creates a new instance of the Retrofit builder.
baseUrl(Utils.BASE_URL)
Sets the base URL for all the API endpoints. It’s the starting point for relative URLs specified in the interface methods.
Create a Utils class to store all constant that are used in the project.

addConverterFactory(GsonConverterFactory.create())
The .addConverterFactory(GsonConverterFactory.create()) method in Retrofit is used to specify the converter factory for handling serialization and deserialization of JSON data using Gson in Android app.
Purpose:
JSON Conversion: When your Android app communicates with a web service that sends and receives JSON data, Retrofit needs a way to convert the JSON response body into usable Kotlin/Java objects and vice versa.
Breakdown:
GsonConverterFactory.create(): This method creates an instance of the GsonConverterFactory, which is a Retrofit converter factory that uses Gson for JSON conversion.
Gson: Gson is a popular Java library from Google used for JSON serialization/deserialization. It provides a way to convert Java/Kotlin objects to JSON and JSON to Java/Kotlin objects.
Converter Factory: Retrofit uses converter factories to handle the conversion between HTTP request/response bodies and Java/Kotlin objects. The GsonConverterFactory is specifically designed to work with Gson, allowing Retrofit to handle JSON data.
4. Create Retrofit Interface
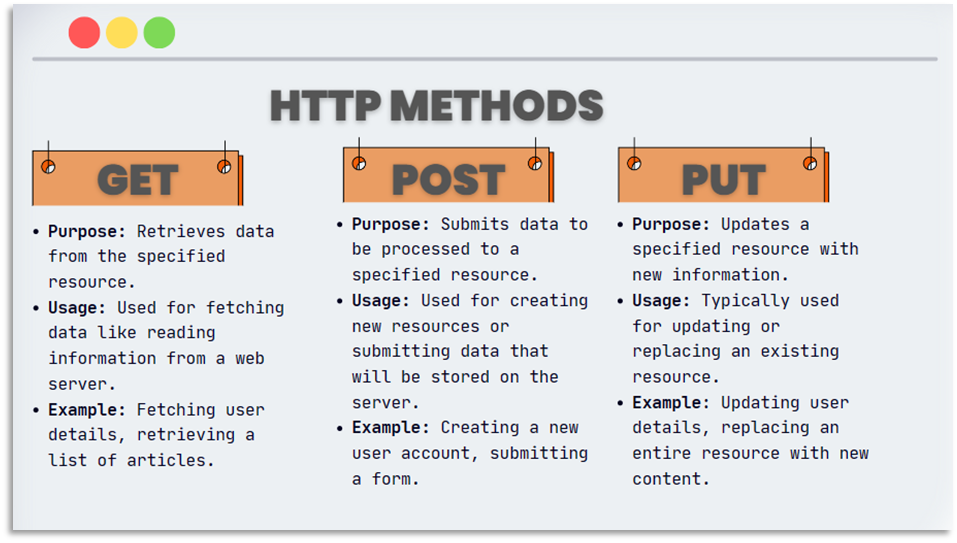
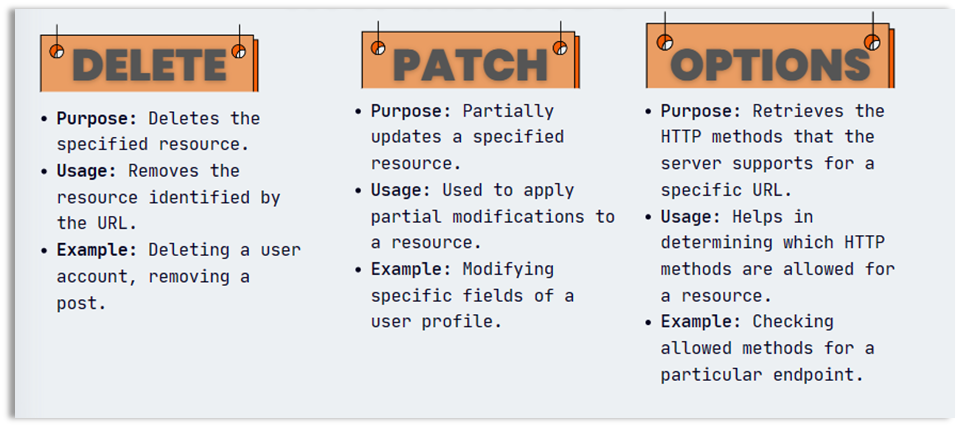
Define an interface that specifies the API endpoints and their associated HTTP methods (GET, POST, PUT, DELETE). In Retrofit, this is achieved using annotations to define the API interface:
Endpoints refer to the specific URLs or paths of a web service or API.
interface ApiInterface {
    @GET("forecast?")
    fun getWeather(
        @Query("lat") lat:String,
        @Query("lon") lon:String,
        @Query("appid") appid:String=Utils.API_KEY
    ):Call<WeatherData>
    @GET("forecast?")
    fun getWeatherByCity(
        @Query("q") city:String,
        @Query("appid") appid:String=Utils.API_KEY
    ) : Call<WeatherData>
Please check the URL properly.
That means we are just structuring api URL in the Interface class.
@GET(“forecast?”): Indicates that this method will perform an HTTP GET request to the specified relative URL “forecast?” when called.
getWeather(…)/getWeatherByCity: Defines a function that will be invoked to make the API call.
@Query(“q”) cityName: String: Specifies a query parameter “q” with the value of the cityName variable. For instance, if cityName is “New York,” the request URL might look like /weather?q=New%20York.
@Query(“appid”) apiKey: String: Adds another query parameter “appid” for the API key.
api.openweathermap.org/data/2.5/forecast?q={city name}&appid={API key}
5. Make API Calls
Now we can use the retrofit instance created through Retrofit to make API calls. You’ll typically call these methods from within an appropriate context, like a ViewModel or a coroutine scope.
// Inside ViewModel or CoroutineScope
viewModelScope.launch {
    try {
        val response = RetrofitInstance.retrofit.getWeather()
        if (response.isSuccessful) {
            val data = response.body() // Access the response data
            // Handle the retrieved data here
        } else {
            // Handle unsuccessful response
        }
    } catch (e: Exception) {
        // Handle exceptions or network errors
    }
}
Handle network operations on background threads to prevent blocking the UI thread.
The code of ViewModel for the Weather App is here.
App permissions
App required the following permissions please add these in the manifest.
<uses-permission android:name="android.permission.INTERNET" />
<uses-permission android:name="android.permission.ACCESS_COARSE_LOCATION"/>
<uses-permission android:name="android.permission.ACCESS_FINE_LOCATION"/>
<uses-permission android:name="android.permission.ACCESS_WIFI_STATE"/>
Application class of Weather app
In Android, the Application class serves as the base class for maintaining the global application state across the app’s entire lifecycle. You can create a custom subclass of the Application class to perform initialization tasks, manage global app-level behavior, and maintain a consistent state throughout the app.

Creating an Application Class:
Creating Custom Application Class:
Create a new Kotlin class that extends the Application to define your custom Application class. For example:
import android.app.Application
class WeatherApplication: Application() {
    // Your custom implementation
}
Registering in Manifest:
Register your custom Application class in the AndroidManifest.xml file under the <application> tag by specifying the android:name attribute:
<application
    android:name=". WeatherApplication "
    <!-- Other attributes -->
    >
    <!-- Other components (activities, services, etc.) -->
</application>
Usage and Responsibilities:
Global Initialization:
- Initialize global components, such as setting up analytics tools, initializing dependency injection frameworks (like Dagger), or configuring Crashlytics or logging systems.
Maintaining Global State:
- Store and manage global variables or application-level data that should persist across activities or components.
Lifecycle Management:
- Respond to application lifecycle events using callbacks (onCreate, onTerminate, etc.) to perform specific actions when the application starts or terminates.
Context Provider:
- Access the application context from anywhere in the app via getApplicationContext().
Points to Remember:
The Application class should be used for initialization and managing global application state. Be cautious about adding heavy tasks that might block the main thread during its initialization.
It’s a good practice to avoid storing large amounts of data or long-lived references in the Application class to prevent memory leaks.
Customized SharedPreferences class
Creating a customized SharedPreferences utility class in an Android project allows for a more organized and centralized approach to managing SharedPreferences-related operations.
package net.rishiz.weather

import android.annotation.SuppressLint
import android.content.Context
import android.content.SharedPreferences

class SharedPrefs internal constructor(private val context: Context) {
    companion object{
        private const val SHARED_PREFS_NAME="weather_prefs"
        private const val KEY_CITY="city"
       @SuppressLint("StaticFieldLeak")
       private var instance:SharedPrefs?=null
        fun getInstance(context:Context):SharedPrefs{
            if(instance==null) {
                instance = SharedPrefs(context.applicationContext)
            }
            return instance!!
        }
    }
    private val prefs:SharedPreferences by lazy{
        context.getSharedPreferences(SHARED_PREFS_NAME,Context.MODE_PRIVATE)
    }

    fun setValue(key:String,value:String){
        prefs.edit().putString(key,value).apply()
    }
    fun getValue(key:String):String?{
        return prefs.getString(key,null)
    }
    fun setValuOrNull(key:String?,value:String?){
        if(key!=null && value!=null){
            prefs.edit().putString(key,value).apply()
        }
    }
    fun getValueOrNull(key:String?):String?{
        if(key!=null){
            return prefs.getString(key,null)
        }
        return null
    }

    fun clearCityValue(){
        prefs.edit().remove(KEY_CITY).apply()
    }

}
To understand SharePreference in details visit here.
Adapter classes for RecyclerView
TodayWeatherAdapter
- Create the TodayWeatherAdapter which extends RecyclerView.Adapter<TodayWeatherHolder>()
- TodayWeatherHolder:
- Create TodayWeatherHolder class inside the adapter class having a constructor with parameter view and extends RecyclerView.ViewHolder(view)
- This view is obtained from the onCreateViewHolder() method of the adapter class.
- Define the view that later initializes in onBindViewHolder().
class TodayWeatherHolder(view: View) : RecyclerView.ViewHolder(view) {
    val time: TextView = view.findViewById(R.id.time)
    val timelottieAnimation: LottieAnimationView = view.findViewById(R.id.timelottieAnimation)
    val tempAtTimes: TextView = view.findViewById(R.id.tempAtTime)
}
Now come to adapter class,
- Create a list listOfTodayWeather of type WheatherList.
onCreateViewHolder()
- inflate the row layout that is today_weather_row in our case.
- And return this view.
override fun onCreateViewHolder(parent: ViewGroup, viewType: Int): TodayWeatherHolder {
val view =
LayoutInflater.from(parent.context).inflate(R.layout.today_weather_row, parent, false)
return TodayWeatherHolder(view)
}
getItemCount()
- this method returns the size of the list.
override fun getItemCount(): Int {
    return listOfTodayWeather.size
}
onBindViewHolder()
- Create the todayWeather object which contains the whetherlist at position index.
val todayWeather = listOfTodayWeather[position]
- get the time which is in 24-hour format so we want to convert it into 12 hrs format.
val time24 = todayWeather.dt_txt.substring(11, 16)
- the following function is used to convert time into 12 hrs format.
private fun convertTo12HourFormat(time24: String): String {
        val timeParts = time24.split(":")
        val hour = timeParts[0].toInt()
        val minute = timeParts[1]

        val amPm = if (hour < 12) "AM" else "PM"
        val newHour = if (hour == 0 || hour == 12) 12 else hour % 12

        return "$newHour:$minute $amPm"
    }
- Initialize time view.
holder.time.text = convertTo12HourFormat(time24)
- get the temperature, it is in kelvin so convert it into celcius.
val tempFahrenheit = todayWeather.main.temp
val tempCelsius = (tempFahrenheit.minus(273.15))
val tempFormatted = String.format("%.2f", tempCelsius)
- Initialize temperature view (view name is tempAtTimes holder).
“${tempFormatted}℃”.also { holder.tempAtTimes.text = it }
- This Kotlin syntax concatenates the ℃ string with a value and also sets the value to its view.
- Now lottieAnimationView is pending which will be initialized as per the weather conditions.
for (weather in todayWeather.weather) {
    when (weather.description) {

        "clear sky" -> {
            holder.timelottieAnimation.setAnimation(R.raw.sun)
        }

        "few clouds", "scattered clouds", "broken clouds", "overcast clouds" -> {
            holder.timelottieAnimation.setAnimation(R.raw.cloud)
        }
               .
               .   // add the other conditions or check full code on github
               .
      else -> {
        holder.timelottieAnimation.setAnimation(R.raw.sun)
    }
}
holder.timelottieAnimation.playAnimation()
}
- To play the animation use the below command
- Holder.timelottieAnimation.playAnimation
fun setList(newList: List<WeatherList>) {
    this.listOfTodayWeather = newList
}
this function is used to set the new list, which came from observing live data.
FutureForecastAdapter
All the procedures are the same as the above adapter just one difference is that view binding.
FutureForecastHolder
class FutureForecastHolder(binding: FutureForecastRowBinding) :
    RecyclerView.ViewHolder(binding.root) {
    val day = binding.nextDay
    val lottieAnimationView = binding.nextDayAnimation
    val temp = binding.nextDayTemp
    val icon = binding.stausIcon
    val desc = binding.weatherDescr
    val windSpeed = binding.nextDayWind
    val humidity = binding.nextDayHumadity
}
OncreateViewHolder
The layout inflates as below by view binding.
override fun onCreateViewHolder(parent: ViewGroup, viewType: Int): FutureForecastHolder {
    val inflater = LayoutInflater.from(parent.context)
    val view = FutureForecastRowBinding.inflate(inflater, parent, false)
    return FutureForecastHolder(view)
}
OnBindViewHolder
- get the weather description.
for (i in weatherObject.weather) {
    holder.desc.text = i.description
}
- Initialize other views as below.
holder.humidity.text = "${weatherObject.main.humidity}%"

"${weatherObject.wind.speed} m/s".also { holder.windSpeed.text = it }

val tempFahrenheit = weatherObject.main.temp
val tempCelcius = (tempFahrenheit.minus(273.15))
val tempFormatted = String.format("%.2f", tempCelcius)
"${tempFormatted}℃".also { holder.temp.text = it }
- To set the value of the date and day text we have to format the date as below.
val inputFormat = SimpleDateFormat("yyyy-MM-dd HH:mm", Locale.getDefault())
val date = inputFormat.parse(weatherObject.dt_txt)
val outputFormat = SimpleDateFormat("d MMMM EEEE", Locale.getDefault())
val dateNday = date?.let { outputFormat.format(it) }
holder.day.text = dateNday
- To display the weather icon in our row layout we use
https://openweathermap.org/img/wn/01d@2x.png
- The base URL is stored in our util, and the other part is formatted based on the current weather conditions.
ICON_URL:String=https://openweathermap.org/img/wn/
- To load the images via URL, we use the Picasso library due to its simplicity, although we recommend using the Glide library instead.
for (weather in weatherObject.weather) {

    when (weather.icon) {
        "01d" -> {
            val url = Utils.ICON_URL + "01d@2x.png"
            //Glide.with(WeatherApplication.instance).load(url).into(holder.icon)
            Picasso.get().load(url).into(holder.icon)
        }

        "01n" -> {
            val url = Utils.ICON_URL + "01n@2x.png"
            //Glide.with(WeatherApplication.instance).load(url).into(holder.icon)
            Picasso.get().load(url).into(holder.icon)
        }
                 .
                 .        // add other condition or check full code in github
    }
Set the animation view same as the above adapter and also add the setList method.
ViewModel class
Add the following dependency to use ViewModel.
//viewmodel
implementation ("androidx.lifecycle:lifecycle-viewmodel-ktx:2.6.2")
Declare the following variables.
val todaysWeatherLiveDataList = MutableLiveData<List<WeatherList>>()
val tomorrowWeatherData = MutableLiveData<List<WeatherList>?>()
val futurWeatherLiveDataList = MutableLiveData<List<WeatherList>>()
val closerToExactWeather = MutableLiveData<WeatherList?>()
val cityName = MutableLiveData<String>()
val sunrise = MutableLiveData<String?>()
val sunset = MutableLiveData<String?>()
val context = WeatherApplication.instance
private val sharedPrefs = SharedPrefs.getInstance(context)
The cityName, sunrise, and sunset are used for data binding which means these are used to update UI value.
We have already added a data element in the XML file.
getWeather() function
We don’t know if the weather could be from the city search or location so we have made this function that will do both things.
That is why this function can take a string argument or no argument and still it works.
Kotlin coroutines to done the operations on background thread.
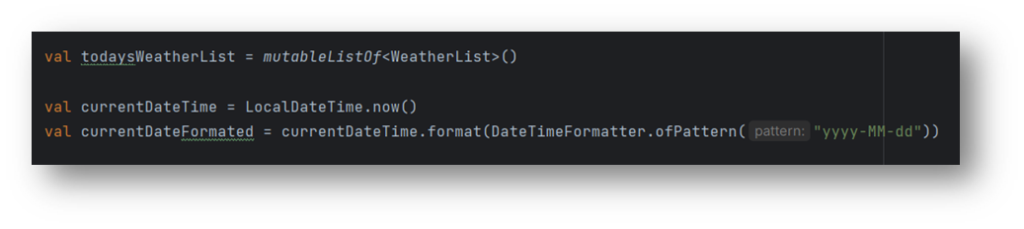
Create a mutable list of type WheatherList, get the current date and time and format it.
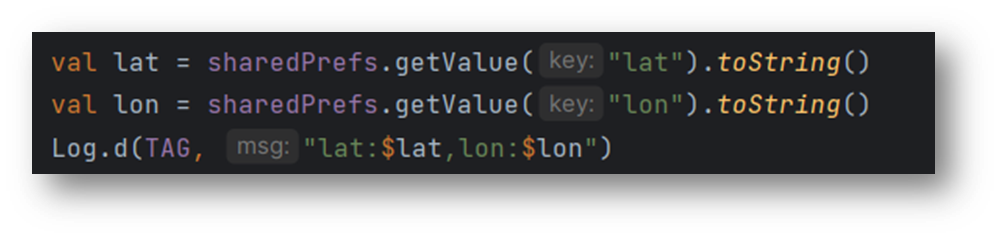
In MainActivity, once we get the location from the geocoder, we will store the latitude and longitude values in SharedPreference and access those values here.
If city not null , user search the city then call getWeatherByCity else gets weather by latitude and longitude.

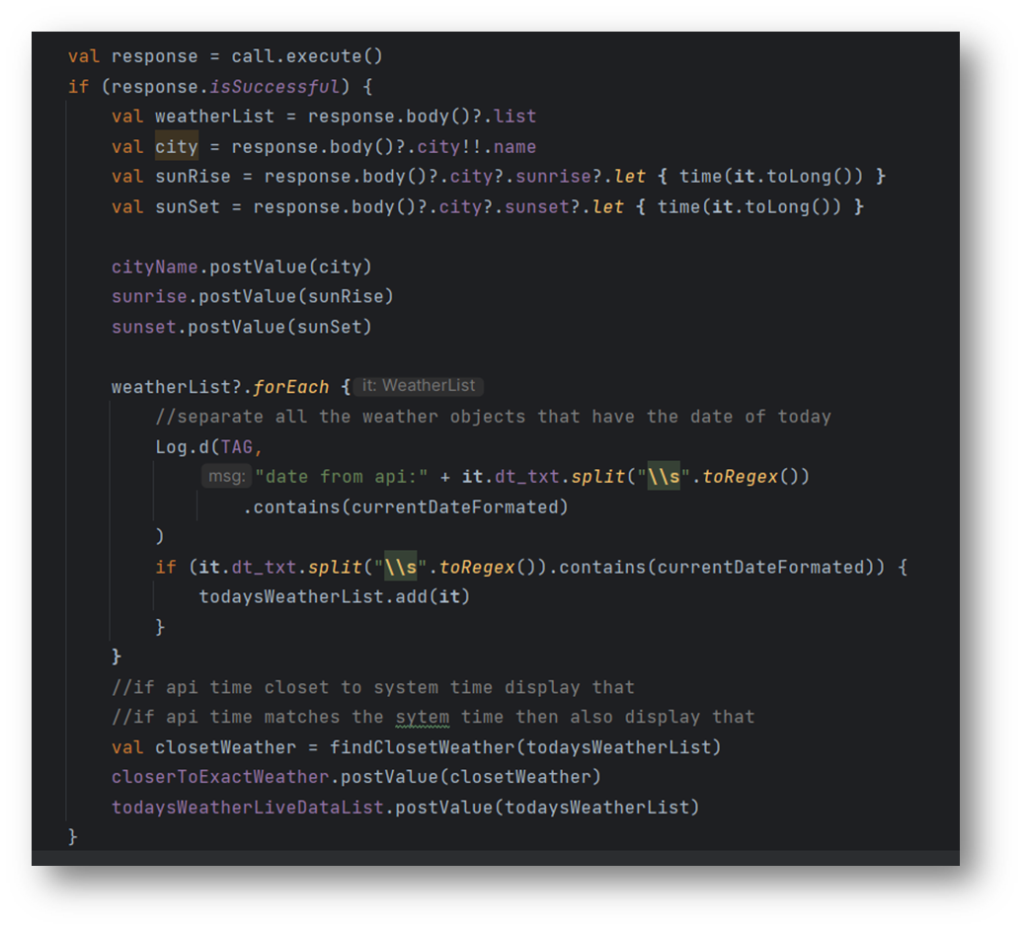
Call.execute the API call and if the response is successful get the wheater list.
City name, sunrise, and sunset data is obtained from city data as it is not included in the weather list, post these values and it is set to the ui by data binding.
From the weatherList sort the data which contains today’s date and add it to our mutable list.
Our API sends the weather data every 3 hrs interval so we have to sort the data on the following condition,
- If API time is closet to the system time display that
2. If API time matches the system time
Set the closetWeather data into closerToExactWeather list and the mutable list to todaysWeatherLiveDataList.
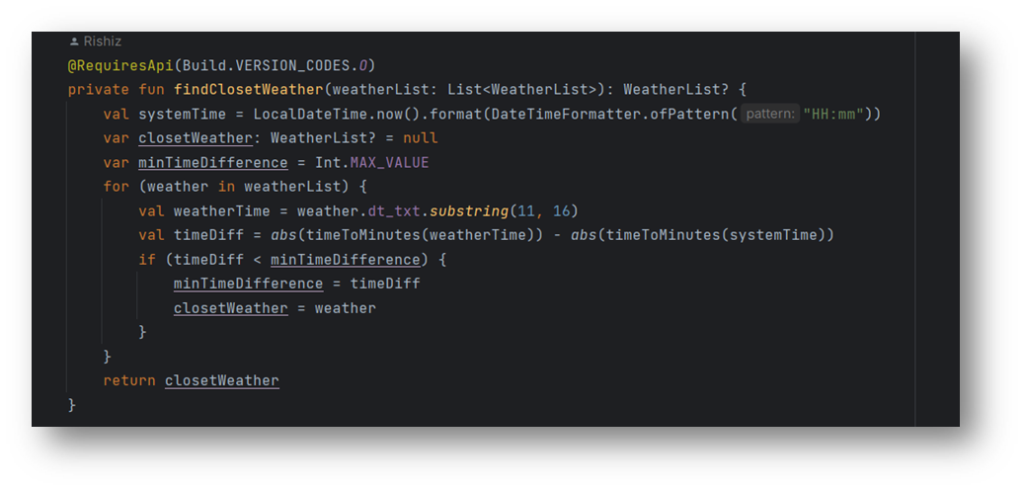
It is simple logic to find the minimum difference between two times and then retrieve the data at that time.
getFutureWeather() function
The whole function is the same getWeather() just make the following change.

This sorts the data of date which does not contain the today and tomorrow’s date.
Tomorrow’s Weather data
We have to display tomorrow’s data separately, and get tomorrow’s date.
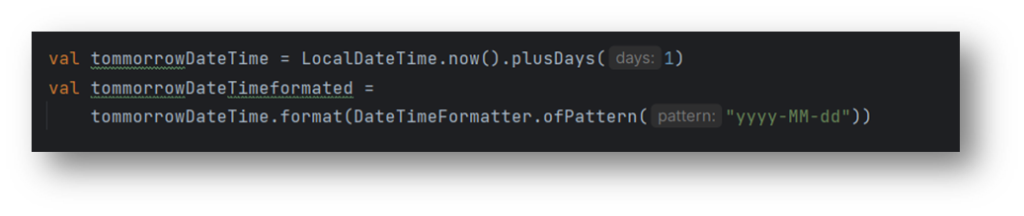
To sort tomorrow’s data from WeatherList, use Kotlin’s beautiful filter function. It can be done in just one line.

SplashScreenAcitivity
Implementing a splash screen in an Android app involves displaying a launch screen or a visual element while your app loads its main components or performs necessary initialization.
class SplashScreenActivity : AppCompatActivity() {
    override fun onCreate(savedInstanceState: Bundle?) {
        super.onCreate(savedInstanceState)
        setContentView(R.layout.activity_splash)
        Handler(Looper.getMainLooper()).postDelayed({
            val intent= Intent (this, MainActivity::class.java).setFlags(Intent.FLAG_ACTIVITY_CLEAR_TASK
                    or Intent.FLAG_ACTIVITY_CLEAR_TOP)
            startActivity(intent)
            finish()
        },2000)
    }
}
Inside the Handler of the SplashActivity, the main activity is started after a certain delay, during which the splash screen is visible to the user.
FutureForecastActivity
- Declare the binding variable and initialize it by lazy.
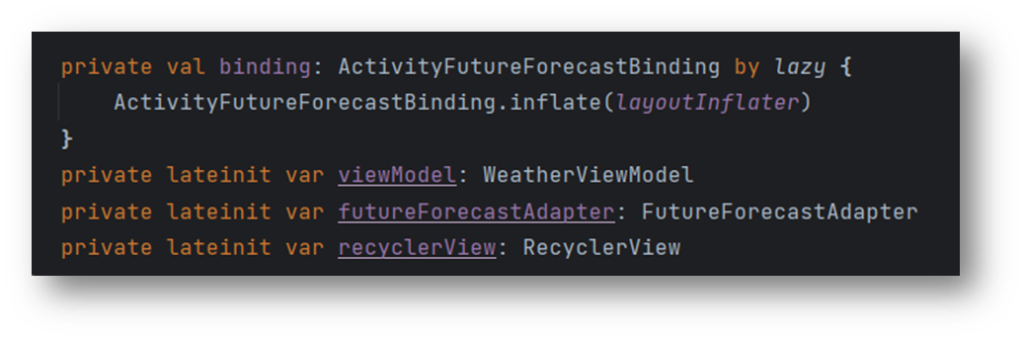
- Declare viewModel, adapter, and recyclerview also.
- Initialize viewModel by ViewModelProvider
- viewModel = ViewModelProvider(this)[WeatherViewModel::class.java]
- Access city value from SharedPreference.

- Call getFutureWeather() with the following condition.

- Observe the tomorrowWeatherDate and access the required data.

- \u2103 is the code degree celcius.
- There is the nested list so that is why double for loop is used.
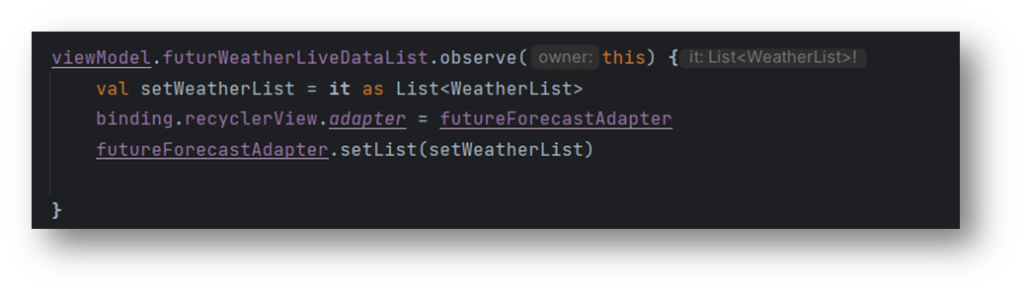
- Observe the futureWeatherLiveDataList and set it to the adapter list.
private fun changeImagesAccordingToWeather(condition: String) {
    when (condition) {
        "clear sky" -> {
            binding.root.setBackgroundResource(R.drawable.clear_sky_bg)
            binding.lottieAnimationView.setAnimation(R.raw.sun)
        }

        "few clouds", "scattered clouds", "broken clouds", "overcast clouds" -> {
            binding.root.setBackgroundResource(R.drawable.cloud_bg)
            binding.lottieAnimationView.setAnimation(R.raw.cloud)
        }
                         .
                         .  // do same for other condition or check github
                         .
    else -> {
    binding.root.setBackgroundResource(R.drawable.clear_sky_bg)
    binding.lottieAnimationView.setAnimation(R.raw.sun)
   }
}
   binding.lottieAnimationView.playAnimation()
}
MainActivity
Declare the variables at the top.

And initialize them as below.

Check location permission and if not have permission, then request permission.

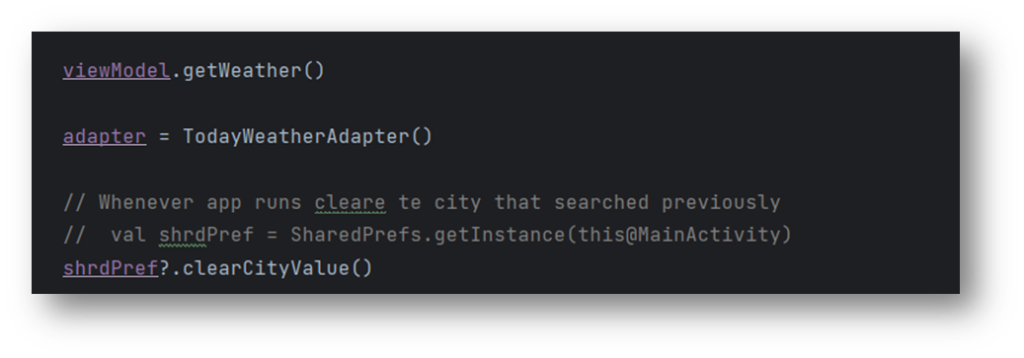
Call the getWeather function and Whenever the app runs clear the city that was searched previously.
Observe the TodayWeatheLiveData list and set this list to the adapter list.

Observe the closetToExactWeather and get the required data from it.
viewModel.closerToExactWeather.observe(this) { it ->

    val tempFahrenheit = it!!.main.temp
    val temp_min = it.main.temp_min
    val temp_max = it.main.temp_max

    binding.temp.text = "${convertTempFaherenheitToCelsius(tempFahrenheit)}℃"
    "${convertTempFaherenheitToCelsius(temp_min)}℃".also { binding.minTemp.text = it }
    "${convertTempFaherenheitToCelsius(temp_max)}℃".also { binding.maxTemp.text = it }
    for (weather in it.weather) {
        binding.weather.text = weather.description
        changeImagesAccordingToWeather(weather.description)
    }

    val humidity = it.main.humidity
    val windspeed = it.wind.speed
    val sea_level = it.main.sea_level

    "$humidity%".also { binding.humidity.text = it }
    "$windspeed m/s".also { binding.windspeed.text = it }
    "$sea_level hPa".also { binding.sea.text = it }

    val inputFormat = SimpleDateFormat("yy-MM-dd HH:mm", Locale.getDefault())
    val date = inputFormat.parse(it.dt_txt)
    val outFormat = SimpleDateFormat("d MMMM EEEE", Locale.getDefault())
    val dateNdayName = outFormat.format(date!!)

    Log.d(TAG, "dateNdayName:$dateNdayName")
    binding.date.text = dateNdayName
    binding.chanceofrain.text = "${it.pop}%"
}
changeImageAccordingToWeather() is the same as above.
Call searchCity() function will come to this in a few minutes and handle click on Next5days text.

checkLocationPermission() function
This will verify is the permission granted or not.
  private fun checkLocationPermission(): Boolean {
        val fineLocationPermission = ContextCompat.checkSelfPermission(
            this,
            android.Manifest.permission.ACCESS_FINE_LOCATION
        )
        val coarseLocationPermission = ContextCompat.checkSelfPermission(
            this,
            android.Manifest.permission.ACCESS_COARSE_LOCATION
        )

        return fineLocationPermission == PackageManager.PERMISSION_GRANTED &&
                coarseLocationPermission == PackageManager.PERMISSION_GRANTED
    }
These are all permissions included in the manifest.
requestLocationPermission function
   private fun requestLocationPermission() {
        ActivityCompat.requestPermissions(
            this,
            arrayOf(
                android.Manifest.permission.ACCESS_FINE_LOCATION,
                android.Manifest.permission.ACCESS_COARSE_LOCATION
            ), Utils.PERMISSION_REQUEST_CODE
        )
    }
onRequesetPermissionResult
this is the call back from the system based on user action on permission request, if permission granted then do the further operations.
 @RequiresApi(Build.VERSION_CODES.O)
    override fun onRequestPermissionsResult(
        requestCode: Int,
        permissions: Array<out String>,
        grantResults: IntArray
    ) {
        super.onRequestPermissionsResult(requestCode, permissions, grantResults)
        if (requestCode == Utils.PERMISSION_REQUEST_CODE) {
            if (grantResults.isNotEmpty() && grantResults[0] == PackageManager.PERMISSION_GRANTED &&
                grantResults[1] == PackageManager.PERMISSION_GRANTED
            ) {
                getCurrentLocation()
            } else { //permisioon denied handle}
            }
        }
    }
getCurrentLocation() function
  @RequiresApi(Build.VERSION_CODES.O)
    private fun getCurrentLocation() {
        val locationManager = getSystemService(Context.LOCATION_SERVICE) as LocationManager

        if (ActivityCompat.checkSelfPermission(
                this,
                android.Manifest.permission.ACCESS_FINE_LOCATION
            ) == PackageManager.PERMISSION_GRANTED &&
            ActivityCompat.checkSelfPermission(
                this,
                android.Manifest.permission.ACCESS_COARSE_LOCATION
            ) == PackageManager.PERMISSION_GRANTED
        ) {
            val location: Location? =
                locationManager.getLastKnownLocation(LocationManager.NETWORK_PROVIDER)
            val latitude = location?.latitude
            val longitude = location?.longitude

            //set lon lat and get this in the viewmodel
            shrdPref?.setValue("lat", latitude.toString())
            shrdPref?.setValue("lon", longitude.toString())

            viewModel.getWeather()

            Toast.makeText(this, "latitude:$latitude longitude:$longitude", Toast.LENGTH_SHORT).show()
            Log.d(TAG, "latitude:$latitude,longitude:$longitude")

        }
    }
LocationService
getSystemService(Context.LOCATION_SERVICE) method retrieves the system’s location service, which is used to access location-related features such as obtaining the device’s current location using GPS, network providers, or other location sensors.
The ‘as LocationManager’ part of the code casts the retrieved service to a LocationManager object, indicating that you expect the system service to be a LocationManager. This allows you to use methods and functionality specific to the LocationManager class.
For instance, after this retrieval, you can use the LocationManager object to request location updates, check location provider status, or perform other operations related to the device’s location.
getLastKnownLocation(LocationManager.NETWORK_PROVIDER): It requests the last known location from the network provider. This method tries to retrieve the most recently known location using the network-based location data.
Set the location’s longitude and latitude to the shared preferences and call getweather once on this action.
SearchCity()
On Serchview add the QueryTextListner, on search store that values in shared preference and call getWeather() function with the query as a parameter.
private fun searchCity() {
    binding.searchView.setOnQueryTextListener(object : SearchView.OnQueryTextListener {
        @RequiresApi(Build.VERSION_CODES.O)
        override fun onQueryTextSubmit(query: String?): Boolean {
            val shrdPref = SharedPrefs.getInstance(this@MainActivity)
            shrdPref.setValuOrNull("city", query!!)
            if (query.isNotEmpty()) {
                viewModel.getWeather(query)
                binding.searchView.setQuery("", false)
                binding.searchView.clearFocus()
                binding.searchView.isIconified = true

            }
            return true
        }

        override fun onQueryTextChange(newText: String?): Boolean {
            return true
        }

    })
}
Huuush! That’s all.
Download code
rishizni/android-weather_forecasting-app (github.com)

[…] Check out this real-time example of retrofit library Weather App in Android using Retrofit. […]