

Android Layouts
Android layouts play a crucial role in creating visually appealing and user-friendly mobile applications. As a beginner Android developer, understanding and mastering layout design is essential for building successful apps.
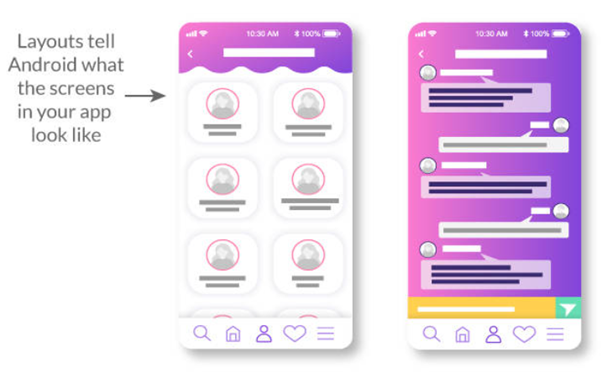
Table of Contents
What does each screen look like?
A typical Android app comprises of one or more screens.
The appearance of each screen is defined using layouts.
Layouts are typically defined in XML and can include GUI components such as text fields, buttons, and labels.
Layout basically refers to the arrangement of elements on a page these elements are likely to be images, texts or styles.
These are a part of Android Jetpack. They define the structure of android user interface in the app, like in an activity.
All elements in the layout are built with the help of Views and ViewGroups. These layouts can have various widgets like buttons, labels, textboxes, and many others.
Attributes of Layout in Android
- android:id: It uniquely identifies the Android Layout.
- android:hint: It shows the hint of what to fill inside the EditText.
- android:layout_height: It sets the height of the layout.
- android:layout_width: It sets the width of the layout.
- android:layout_gravity: It sets the position of the child view.
- android:layout_marginTop: It sets the margin of the from the top of the layout.
- android:layout_marginBottom: It sets the margin of the from the bottom of the layout.
- android:layout_marginLeft: It sets the margin of the from the left of the layout.
- android:layout_marginRight: It sets the margin of the from the right of the layout.
- android:layout_x: It specifies the x coordinates of the layout.
- android:layout_y: It specifies the y coordinates of the layout.
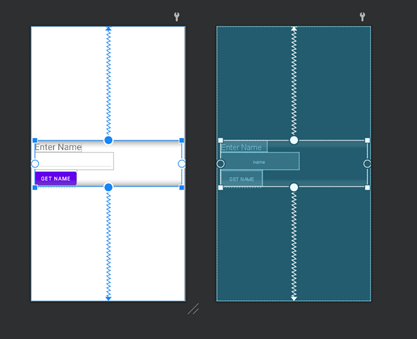
LinearLayout
LinearLayout is a view group that aligns all children in a single direction, vertically or horizontally. You can specify the layout direction with the android:orientation attribute.
 <LinearLayout
        android:layout_width="match_parent"
        android:layout_height="wrap_content"
        android:orientation="vertical"
        app:layout_constraintBottom_toBottomOf="parent"
        app:layout_constraintEnd_toEndOf="parent"
        app:layout_constraintStart_toStartOf="parent"
        app:layout_constraintTop_toTopOf="parent">

        <TextView
            android:layout_width="wrap_content"
            android:layout_height="wrap_content"
            android:text="Enter Name"
            android:textSize="24sp" />

        <EditText
            android:layout_width="wrap_content"
            android:layout_height="wrap_content"
            android:ems="10" />

        <Button
            android:layout_width="wrap_content"
            android:layout_height="wrap_content"
            android:text="Get Name" />

    </LinearLayout>
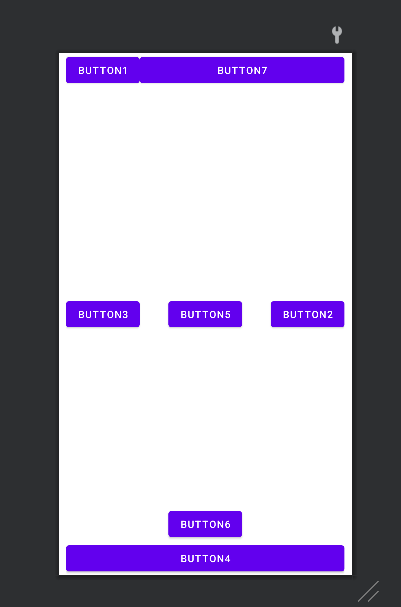
RelativeLayout
RelativeLayout is a view group that displays child views in relative positions. The position of each view can be specified as relative to sibling elements (such as to the left-of or below another view) or in positions relative to the parent RelativeLayout area (such as aligned to the bottom, left or center).
In the relative layout, alignment of the position of the elements to the parent container is possible.
To define it in such a way, we write the following:
- android:layout_alignParentTop= “true”
- android:layout_alignParentLeft= “true”
Some of the many layout properties available to views in a RelativeLayout include:
If “true”, makes the top edge of this view match the top edge of the parent.
If “true”, centers this child vertically within its parent.
Positions the top edge of this view below the view specified with a resource ID.
Positions the left edge of this view to the right of the view specified with a resource ID.
These are just a few examples. All layout attributes are documented at RelativeLayout.LayoutParams.
<RelativeLayout
        android:layout_width="match_parent"
        android:layout_height="match_parent"
        android:paddingLeft="10dp"
        android:paddingRight="10dp">

        <Button
            android:id="@+id/btn1"
            android:layout_width="wrap_content"
            android:layout_height="wrap_content"
            android:layout_alignParentLeft="true"
            android:text="Button1" />

        <Button
            android:id="@+id/btn2"
            android:layout_width="wrap_content"
            android:layout_height="wrap_content"
            android:layout_alignParentRight="true"
            android:layout_centerVertical="true"
            android:text="Button2" />

        <Button
            android:id="@+id/btn3"
            android:layout_width="wrap_content"
            android:layout_height="wrap_content"
            android:layout_alignParentLeft="true"
            android:layout_centerVertical="true"
            android:text="Button3" />

        <Button
            android:id="@+id/btn4"
            android:layout_width="match_parent"
            android:layout_height="wrap_content"
            android:layout_alignParentBottom="true"
            android:text="Button4" />

        <Button
            android:id="@+id/btn5"
            android:layout_width="wrap_content"
            android:layout_height="wrap_content"
            android:layout_alignBottom="@+id/btn2"
            android:layout_centerHorizontal="true"
            android:text="Button5" />

        <Button
            android:id="@+id/btn6"
            android:layout_width="wrap_content"
            android:layout_height="wrap_content"
            android:layout_above="@+id/btn4"
            android:layout_centerHorizontal="true"
            android:text="Button6" />

        <Button
            android:id="@+id/btn7"
            android:layout_width="wrap_content"
            android:layout_height="wrap_content"
            android:layout_alignParentRight="true"
            android:layout_toEndOf="@+id/btn1"
            android:layout_toRightOf="@+id/btn1"
            android:text="Button7" />
    </RelativeLayout>
ConstraintLayout
ConstraintLayout lets you create large, complex layouts with a flat view hierarchy—no nested view groups. It’s similar to RelativeLayout in that all views are laid out according to relationships between sibling views and the parent layout, but it’s more flexible than RelativeLayout and easier to use with Android Studio’s Layout Editor.
Add ConstraintLayout to your project
To use ConstraintLayout in your project, proceed as follows:
1. Ensure you have the maven.google.com repository declared in your settings.gradle file:
dependencyResolutionManagement {
…
repositories {
google()
}
)
2. add the library as a dependency in the module-level build.gradle file, as shown in the following example. The latest version might be different than what is shown in the example.
dependencies {
implementation “androidx.constraintlayout:constraintlayout:2.2.0-alpha11”
// To use constraintlayout in compose
implementation “androidx.constraintlayout:constraintlayout-compose:1.1.0-alpha11”
}
3. In the toolbar or sync notification, click Sync Project with Gradle Files.
For more visit https://developer.android.com/develop/ui/views/layout/constraint-layout
FrameLayout
FrameLayout is designed to block out an area on the screen to display a single item. You can, however, add multiple children to a FrameLayout and control their position within the FrameLayout by assigning gravity to each child, using the android:layout_gravity attribute.
Generally, FrameLayout is used to hold a single child view. Common use cases are creating place holders for inflating Fragments in Activity, overlapping views or applying foreground to the views.
<?xml version="1.0" encoding="utf-8"?>
<FrameLayout xmlns:android="http://schemas.android.com/apk/res/android"
    android:layout_width="match_parent"
    android:layout_height="match_parent"
    android:orientation="vertical"
    android:padding="5dp">

    <TextView
        android:id="@+id/txtvw1"
        android:layout_width="wrap_content"
        android:layout_height="wrap_content"
        android:layout_marginLeft="100dp"
        android:layout_marginTop="10dp"
        android:background="#286F24"
        android:padding="10dp"
        android:text="Login Details"
        android:textColor="#FFFFFF"
        android:textSize="20sp" />

    <EditText
        android:id="@+id/editText1"
        android:layout_width="match_parent"
        android:layout_height="wrap_content"
        android:layout_centerHorizontal="true"
        android:layout_marginTop="80dp"
        android:background="#ECEEE8"
        android:hint="Enter your email"
        android:padding="10dp" />

    <EditText
        android:id="@+id/editText2"
        android:layout_width="match_parent"
        android:layout_height="wrap_content"
        android:layout_centerHorizontal="true"
        android:layout_marginTop="150dp"
        android:background="#ECEEE8"
        android:hint="Enter password"
        android:padding="10dp" />

    <Button
        android:id="@+id/btn1"
        android:layout_width="wrap_content"
        android:layout_height="wrap_content"
        android:layout_marginLeft="110dp"
        android:layout_marginTop="240dp"
        android:text="Submit" />
</FrameLayout>
ScrollView
ScrollView is a container layout that allows you to create scrollable views. It is useful when the content of a layout exceeds the screen size.
These are the common layout used in Android. There are other layouts as below.
GridLayout
GridLayout arranges views in a grid-like structure with rows and columns. It evenly distributes the views within the available space. It is useful for creating grids of items or tabular structures.
TableLayout
TableLayout organizes views in rows and columns, similar to an HTML table. It provides a convenient way to display tabular data.
Next: Which of the Android layouts Linear vs Relative vs Constraint is better?
[…] Next: Android Layouts […]